Cutting technique of Camellia
Camellia, also known as Camellia, belongs to the genus Camellia of Theaceae. Camellia flower is rich, dignified and elegant, which is one of the top ten traditional flowers in China and one of the famous flowers in the world. Camellia is very convenient to manage as long as the temperature is right, and its dislike of fertilizer makes daily management easier. Sex likes a warm, humid environment. The flowering period is longer, blooming from October to May of the following year, and the flowering period is usually from January to March.
The autumn cuttage of family potted camellias is usually carried out from September to October. Autumn cutting is best to make use of the branches retained in summer, because these new branches have been semi-lignified and can fully meet the needs of healing and rooting in terms of energy. therefore, some varieties will still take root in that year, but they generally cannot branch in the same year. It will not be able to branch and release leaves until next spring. In winter, it is necessary to take measures to prevent cold and drought and strengthen management.

Family cuttings or cuttings of a small number of precious varieties are often used in pots, wooden boxes and other utensils. Shallow mud basins should be used in pots, and short wooden boxes with more cracks should be used in wooden cases. The cutting soil is made of fresh and clean pine needle rotten leaf soil and mixed with 1 to 3 river sand. Regardless of pot or wooden box cutting, should first drain holes in the bottom of the basin box, cover a plastic window screen, and then cover it with a layer of coarse gravel. The rotten leaf soil should be added to the upper and lower thick layers until the height of the box is 1-2-2-3. If a piece of glass is covered on top of a basin or box, the space on the box should be left a little larger.
After the pot box is full, it should be calm and shake the box repeatedly to stabilize the soil and make the cuttings close to the soil. After the basin box is full, spray water with a fine spray pot or put the cuttage basin into a slightly larger basin, and the large basin is filled with clear water, so that the water can slowly seep upward from the drainage holes and walls of the basin bottom into the soil in the basin, and move out when the topsoil is wet through. In this way, the erosion of the topsoil and the hardening of the basin surface can be avoided.
The following are the specific operation steps of camellia cutting technology:
1. Preparation of cutting substrate.
The cutting substrate is required to have the characteristics of heat preservation, moisturizing, loosening and breathing. generally, sandy soil or soil rich in humus can be used as cutting substrate, and loess without impurities and argillaceous can also be used when the conditions do not allow or mass propagation. About a week before cutting, the cutting substrate should be exposed to the sun or disinfected with potassium permanganate solution. Wait until 1-2 days before cutting, and then wet the cutting substrate with water.
2. Cutting and cuttings treatment
As cuttings, the young branches take root more easily than the old ones, and the semi-lignified shoots take root more easily than the completely lignified old branches. therefore, from the camellia mother plants with good quality, stable characters, strong growth, disease-free and short age, the fully developed semi-lignified branches of the same year should be selected as cuttings and cut into cuttings 8-10 cm long, keeping the upper two leaves. The rest of the leaves are cut from the base of the petiole, the upper end of the cuttings is cut flat at about 0.5-1 cm from the bud, and the lower end is cut obliquely near the internodes.
3. Cutting method
When cutting, we should follow the principle of cutting along with picking, and insert the treated cuttings into the wet substrate (usually about 3 cm, which can be cut deeper in arid areas). In order to avoid damage to the cortex at the base of the cuttings, you can first punch holes with a stick thicker than the branches, then insert the cuttings, and then gently compact the soil with your fingers to make the soil in close contact with the cuttings. The suitable cutting density is slight overlap of leaves.
4. Plug-in management
The four factors affecting the rooting of cuttings are humidity, temperature, air and light. Immediately after cutting, the seedbed should be watered once, and a bow shed should be set up and covered with plastic film to keep the air humidity at about 95% and the temperature at 18-27 degrees. At the beginning, the seedbed should be shaded, and the degree of shading should be a little bigger. in case of high temperature, it can be cooled by foliar spray or spray in the air. After 15-20 days, the healing tissue begins to produce, at this time, the amount of water can be gradually reduced and the humidity can be maintained by about 85%. About 20 days after the formation of healing tissue, it began to take root, and after that, the amount of irrigation could be further reduced to keep the soil moist. In the case of avoiding direct strong light, gradually increase the light time, so that the seedlings for photosynthesis, but also can properly lift both ends of the film to make it ventilated.
Time: 2019-06-10 Click:

- Prev
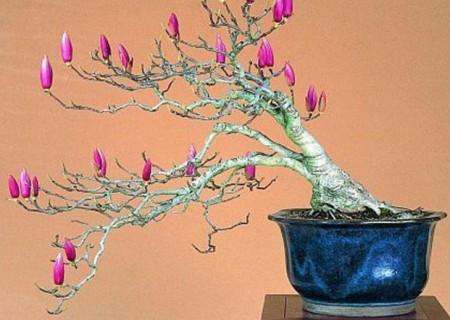
Grafting method / technique of potted Magnolia
Purple magnolia is not only large and beautiful flowers, graceful flowers, fragrant smell, high ornamental value. Purple magnolia flowers are gorgeous and pleasant, fragrant and elegant, whether cultivated alone or multiple plants together are very beautiful, mainly used for greening the environment, we can often see them on both sides of the road. The purple magnolia has a beautiful shape.
- Next
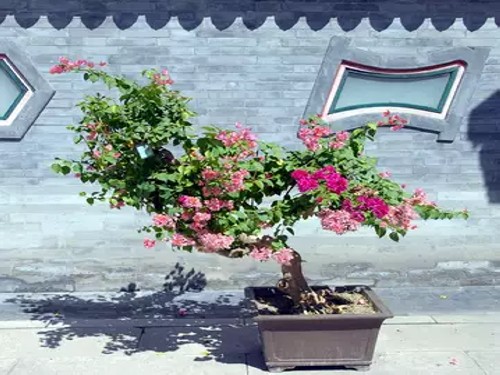
Modeling method of crape myrtle bonsai
Crape myrtle has been a very good bonsai tree since ancient times, and it is one of the pile landscape Rocks of Eighteen Scholars. It is widely used in the Huizhou school and Sichuan school in the traditional eight pile landscape schools. Crape myrtle has the characteristic of exposing its roots, and the older the tree is, the more Qiu qu its roots are, which has a vigorous, simple, elegant and finishing effect.
Related
- Fuxing push coffee new agricultural production and marketing class: lack of small-scale processing plants
- Jujube rice field leisure farm deep ploughing Yilan for five years to create a space for organic food and play
- Nongyu Farm-A trial of organic papaya for brave women with advanced technology
- Four points for attention in the prevention and control of diseases and insect pests of edible fungi
- How to add nutrient solution to Edible Fungi
- Is there any good way to control edible fungus mites?
- Open Inoculation Technology of Edible Fungi
- Is there any clever way to use fertilizer for edible fungus in winter?
- What agents are used to kill the pathogens of edible fungi in the mushroom shed?
- Rapid drying of Edible Fungi