Split grafting technique of Pear Tree
Pear trees are easy to be grafted in fruit trees, and most grafting methods are easy to survive. It is best to adopt three bud grafting methods: "sticking bud grafting", "embedded bud grafting" and "T" bud grafting in summer, and two branch grafting methods of "single bud abdominal grafting" and "split grafting" in spring.
The period of high seed replacement is usually in March-April in spring and August-September in autumn. It is mainly branch grafting in spring and bud grafting in summer and autumn. The main grafting methods are subcutaneous grafting, split grafting, cutting grafting, bud grafting and subcutaneous ventral grafting, and subcutaneous ventral grafting is mainly used for grafting on old branches.

According to the principle of "more lateral oblique branches in strong trees and more upper dorsal branches in weak trees", the branches other than backbone branches were cut and split at the base after short cutting, and then cultured into fruiting branch group.
Split grafting technique of pear trees:
It can also be used for thinner rootstocks and is very suitable for high grafting of fruit trees.
1. Cutting scion
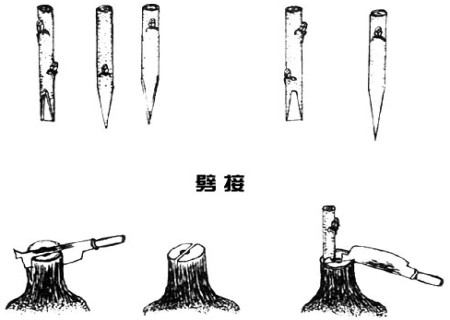
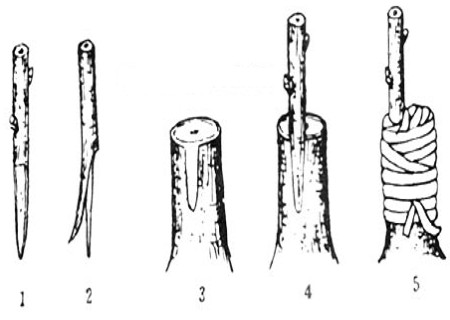
The scion is cut into a wedge, with two symmetrical cutting surfaces and a long 3~5cm. The outside of the scion should be slightly thicker than the inside. If the rootstock is too thick and the clamping force is too large, the inner and outer thickness can be the same or the inside is slightly thicker to prevent the joint from being clamped. The cutting surface of the scion is required to be straight and smooth, and the rough cutting surface is not easy to combine closely. When cutting the scion, use the left hand to hold the scion and the right hand push knife to cut into the scion obliquely. Push knife force should be uniform, consistent, push knife direction should be consistent with the direction of the knife.
If the force is uneven, the force before and after the force is inconsistent, the cutting surface will not be smooth, and the upward deviation of the midway direction will make the cutting surface not straight. If the knife is uneven, one or two more knives can be mended to make the cutting surface meet the requirements.
2. Cut the rootstock
Cut or saw off the rootstock at the grafting site. The position of the cut is very important, so that the surface of the stump is smooth and the texture is straight, at least there is no scar in the upper and lower 6cm, otherwise the seam is not straight and the wood is split to one side. After the grafting site is selected and cut, a splitter is used to split one knife in the center of the rootstock to make the split deep 3~4cm.
3. Cutting scion
Pry open the split of the rootstock with the wedge of the cleaver, gently insert the scion into the rootstock, so that the thick side of the scion is outside, the thin side is inside, and then gently remove the chopper.
Special attention should be paid to aligning the cambium of the rootstock and the forming layer of the scion when inserting. Generally speaking, the cortex of the rootstock is thicker than that of the scion, so the outer surface of the scion is slightly more inward than the outer surface of the rootstock, so that the cambium can align with each other.
The xylem can also be used as the standard to align the rootstock with the xylem surface of the scion so that the cambium is aligned. When inserting the scion, we should insert all the cutting noodles and expose the cutting noodles around the 0.5cm.
In this way, the cambium interface between scion and rootstock is larger, and it is beneficial to the formation and healing of meristem. Thicker rootstocks can insert two scions, one on each side.
4. Bind: fasten it with a plastic strip.
Time: 2019-06-09 Click:
- Prev

Tongue grafting technique of pear tree bark insertion
Grafting is to artificially connect the branches or buds and other tissues of one plant to the appropriate parts of the branch, stem or root of another plant, so that it can heal and grow together to form a new plant. This branch or bud is called a scion, and the plant that bears it is called a rootstock. When grafted
- Next

Grafting methods of Pear trees
Pear grafting mainly refers to bud grafting from July to August. One is the grafting of pear nursery seedlings and rootstocks after the establishment of the garden. The second is the grafting when updating the variety. In other words, when the inferior varieties with good branching ability are renewed in the annual pear orchard, the high bud grafting method is used to change the head. Grafted pear rootstocks are grafted with T-shaped buds.
Related
- Fuxing push coffee new agricultural production and marketing class: lack of small-scale processing plants
- Jujube rice field leisure farm deep ploughing Yilan for five years to create a space for organic food and play
- Nongyu Farm-A trial of organic papaya for brave women with advanced technology
- Four points for attention in the prevention and control of diseases and insect pests of edible fungi
- How to add nutrient solution to Edible Fungi
- Is there any good way to control edible fungus mites?
- Open Inoculation Technology of Edible Fungi
- Is there any clever way to use fertilizer for edible fungus in winter?
- What agents are used to kill the pathogens of edible fungi in the mushroom shed?
- Rapid drying of Edible Fungi

