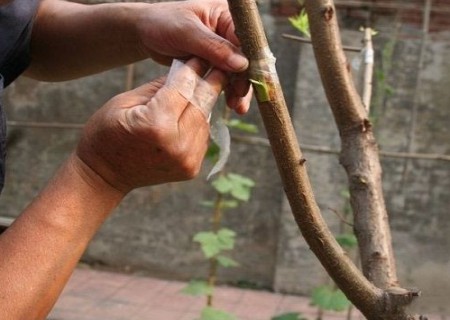
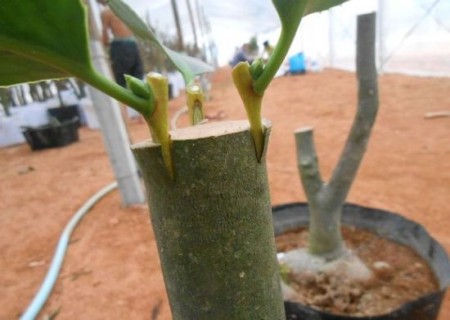
Diagram of T-shaped bud grafting of bonsai
The bud grafting method refers to the method that the scion is grafted with a bud with cambium. This method must ensure that the scion is only robust and pest-free. It should be noted that the survival of the plant should be recorded at any time after the grafting is completed. If it is found that the bud is germinating, the bud should be released from the bandaging film in time, otherwise the survival will be affected. The T-shaped shield bud is usually used, that is, the scion bud is cut into a shield shape, while the rootstock is cut into a T-shaped shape to insert the scion.

When grafting, cut the "T" shape interface on the rootstock, so it is called "T" shape bud grafting, also known as "T" shape bud grafting. This method has the advantages of simple operation, high speed and high survival rate of grafting. Rootstocks generally use 1-2-year-old seedlings, can also be grafted on the new shoots of large rootstocks, the old bark is not suitable to use this method.
1. Essentials of operation
The T-shaped bud grafting is carried out in the growing period. Grafting the rootstock about 4 cm off the ground, first clear the leaves, then cut a T-shaped opening, first cut the horizontal knife, the width is about half the circumference of the rootstock. Cut longitudinally in the middle of the horizontal knife, about 1 cm long. The scion was sprouted with two knives. That is, a knife is crosscut at the upper end of the bud about 0.5 cm, and the width is about half of the thickness of the scion. The other knife starts about 0.5 cm below the petiole. Cut from bottom to top, deep into the xylem and up to the crosscutting. Then move the petiole to one side to remove the bud. The xylem is left on the scion.
When grafting, the left hand holds the bud piece, and the right hand uses the knife tip to pry open the bark on both sides of the "T" shaped mouth of the rootstock, place the lower end of the bud piece into the human incision, hold the petiole and insert it downward, so that the upper side of the bud piece is aligned with the transverse incision of the "T" shaped mouth. Then tie it tightly from bottom to top with a plastic strip about 30 cm long and 1.5 cm wide. There are two ways to bandage:
One is to wrap the buds and petioles, which is quick to operate and has a good rain-proof effect. However, because the buds can not germinate and grow, it is suitable for bud grafting which does not germinate in the same year after grafting. The other is to show buds when bandaging, but tie it tightly around. This method is suitable for budding in the same year. In addition, tree species that are prone to gum flow are also bandaged with dew buds.
II. Specific technology
1. Choose the plant varieties and rootstocks you want to graft.
In order to be successfully grafted, you must cut a scion (a small piece for grafting) from a healthy disease-free plant variety (source tree) and a suitable growth tree (rootstock). In order for T-shaped budding to occur, the bark of both trees must be smooth. This means that the bark is easy to peel off and it is wet under the green layer. This method is usually carried out in spring. Try to water them well to help them grow together. T-shaped bud grafting is usually used for the reproduction of fruit trees.
2. Cut a scion
In order to do T-shaped budding, you must cut 1.8cm above the bud 1.3cm below the branch. The depth of the cut should cover the soft green layer under the bark, but not deeper. In order to be successfully grafted, the green layer must be exposed to your scion. If you must store your scion, wrap it in a wet paper towel, put it in a plastic bag, and store it in the refrigerator.
3. Make a T-shaped cut on your rootstock
Choose a place on the branch or sapling where the diameter should be between 0.6 and 2.5 centimeters. There must be no buds in this place, and it would be better if you could stay away from any other buds. Make a vertical slice on the bark, deep enough to expose a green layer of about 2.5 centimeters. Make a horizontal slice about 1/3 away from the rootstock. Place the knife at the joint of the slice and turn it to move it up and down so that the green layer is visible.
4. Use scion
Slide the scion containing buds below the cut you just made on the rootstock and be careful not to bring any dust or bacteria. If part of the bark of the scion sticks out above the T-notch, cut it off so that the parts are properly glued together.
5. Tie the scion to the rootstock
Wrap an elastic rubber material (such as grafted rubber) around the rootstock to keep the buds in place. Be careful not to squeeze or cover the buds.
6. Remove the straps.
In about a month, the rubber you wrap around the rootstock may come loose and fall off. If not, you can take it apart gently so that the area is not too tight.
7. The condition of following the bud
If the bud looks plump and healthy, it is likely to survive. If it is withered, then it is dead, and you need to start over.
8. Remove other substances
The following spring, once the scion starts to sprout, cut 1.3 cm obliquely on the successfully germinated scion. Other buds growing under the scion should be removed to promote the healthy growth of the grafted scion.
Time: 2019-06-09 Click:
- Prev

Diagram of branch grafting method of bonsai
Seedling grafting propagation means that the branches or buds of one plant are grafted on another plant, so that the two parts connected together become a complete plant. The branches or buds grafted are called scions, and the grounded plants are called rootstocks. Grafting can be divided into two categories: branch grafting and bud grafting, with branches as scions and buds as scions.
- Next

Illustration of grafting technique of bonsai skin insertion
For bark grafting, the phloem of rootstock is easy to peel off, and the rootstock is thicker than scion. The scion should be cut longer to increase the contact surface. The advantage is that the survival rate is high, and the disadvantage is that the grafting speed is slow, and after survival, it is necessary to bind the new shoots with stents to prevent fracture. Mulberry
Related
- Fuxing push coffee new agricultural production and marketing class: lack of small-scale processing plants
- Jujube rice field leisure farm deep ploughing Yilan for five years to create a space for organic food and play
- Nongyu Farm-A trial of organic papaya for brave women with advanced technology
- Four points for attention in the prevention and control of diseases and insect pests of edible fungi
- How to add nutrient solution to Edible Fungi
- Is there any good way to control edible fungus mites?
- Open Inoculation Technology of Edible Fungi
- Is there any clever way to use fertilizer for edible fungus in winter?
- What agents are used to kill the pathogens of edible fungi in the mushroom shed?
- Rapid drying of Edible Fungi

