Illustration of bonsai borehole grafting technique
Bonsai often has all kinds of defects or deficiencies, some roots and claws are good, but they are tall and straight, and there are too few branches. There are indeed a lot of difficulties in developing this kind of pile into bonsai of higher grade. In fact, long, straight can be bent, shrinking into an inch shape, the lack of branch support can be reformed by grafting. The method of pruning branches and roots is simple and practical. The grafting tool is a drilling tool, which can be drilled and pierced in the branch position. After the scion is thick and full of perforation, the branch can be cut from the entrance.
Borehole grafting, also known as traceless grafting, is commonly seen in the process of bonsai production, but few people do it in camellia grafting. We usually use this grafting technique to make camellias bonsai and achieve certain results. Now introduce this technology to Hua you in detail. If you don't also want to graft Camellia Bonsai, you might as well try this method.
Because of the tedious grafting process, the drilling grafting method is not suitable for large-scale grafting, but only suitable for camellias or bonsai lovers. The following is illustrated by one of our grafting cases.

This is a fierce incense bought from the market. First lift the root, trim it, and then maintain it in the basin. The trimmed section is smeared with a healing agent to help the cut heal.
After about a month of maintenance, the branches begin to sprout, and grafting can be considered at this time.
The selection of scion. As the grafting time is still flowering, so the selected branches are annual spring shoots. The branches should be as strong as possible.
Each scion usually needs only one bud and one leaf. The leaves are generally only about half, and the scion length can be determined according to the branch thickness of the rootstock. The upper end of the bud is generally about 5 mm, and the lower end is generally about 2 cm.
After the scion is ready, start drilling. The tools for drilling can be electric drills or they can be made by myself as I do. The depth of drilling is generally about 2 cm, and the depth is determined according to the thickness of the rootstock. It is troublesome to drill holes by hand because it is not convenient to take out sawdust, which takes some time.
When drilling, be careful not to break the bark, the edge of the hole as neat as possible, as far as possible to hollow out sawdust. Another thing to pay attention to is to try not to drill through the branches of the rootstock.
The depth is measured directly with the bit, and then the length of the lower end of the scion is determined according to the depth.
The length of peeling at the lower end of the scion should not exceed the depth of the drill hole, but it can be slightly shorter by about 2 mm.
After the measurement, the scion is cut in a ring, and then peeled. The bud point at the top of the peel should not be less than 5 mm. But don't stay too long, just one centimeter at most.
The diameter of the hole and the scion are not necessarily just right, and the scion is thicker than the hole as far as possible, so that we can trim the scion properly to make it fit closely with the hole. The most important thing is that the cortex of the scion and the cortex of the rootstock must be closely combined and do not leave gaps.
We grafted three scions on this bonsai material, and the position of the grafting was also considered. It is intended to prune the extra branches of the rootstock after the grafting survives.
After grafting, be sure to apply healing glue on the grafting site and the top of the scion. This is conducive to wound healing, but also can protect the scion to prevent water loss. Wait until the healing glue dries the next day before bagging and moisturizing each scion.
After months of maintenance, the scion has survived, remove the plastic bag, and after a period of time, the excess branches of the rootstock can be sawed off.
After inspection, it was found that two of the three scions survived, so we boldly removed all the branches during pruning. Due to the influence of top advantage, the upper scion germinated first and the lower scion sprouted more slowly.
When sawing off the rootstock at the top of the grafting, you should be careful not to hurt the scion, the general reserved length is about 3 mm. All sections should be coated with healing agent to prevent dehydration and facilitate the growth of callus.
Through the local picture, we can see that there is only a slight bulge at the grafting site, which is basically the same as the effect of natural branches.
Drilling and piercing is the highest success rate in the grafting technology. Even higher than the success rate of relying on the connection. Perforation and piercing refers to punching a hole in the trunk (branch) that needs to be patched, and then picking leaves with a slender scion, then passing through the hole and fixing it. With the growth of rootstock and scion, the two will be integrated to complete the grafting process.
In the whole process of grafting, the scion and the female parent were not separated. The scion will not be separated from the female parent until the grafting is successful. Because of this, the success rate of piercing is so high. The failure of grafting is often caused by the premature separation of the scion from the female parent. When piercing, you must wait until the scion and the hole are fully integrated before you can disconnect the scion from the female parent.
Time: 2019-06-09 Click:

- Prev
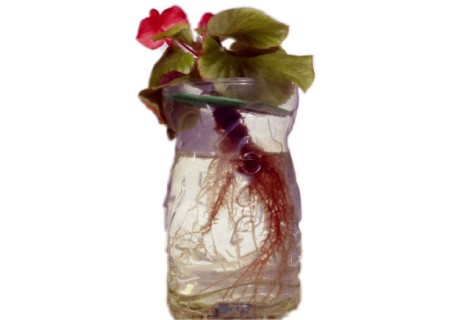
The method of hydroponic culture of begonia in four seasons
In traditional production, four seasons crabapple is usually planted as a perennial greenhouse potted flower, but in recent years, people like to use it in flower beds and indoor potted plants, and the effect is very good. In addition to soil culture, four Seasons Begonia can also be propagated by hydroponic cuttage. But
- Next
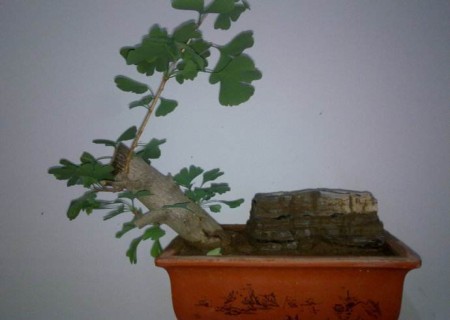
Grafting technique of Ginkgo biloba potted plant
Ginkgo is a long-lived tree, not only slow growth rate, and flowering and fruiting very late, Ginkgo seedlings generally after 20 to 30 years of growth before flowering and fruiting, and low yield, poor quality. However, if grafting technique is adopted, it can blossom and bear fruit in 23 years. Grafting not only produces fruit earlier,
Related
- Fuxing push coffee new agricultural production and marketing class: lack of small-scale processing plants
- Jujube rice field leisure farm deep ploughing Yilan for five years to create a space for organic food and play
- Nongyu Farm-A trial of organic papaya for brave women with advanced technology
- Four points for attention in the prevention and control of diseases and insect pests of edible fungi
- How to add nutrient solution to Edible Fungi
- Is there any good way to control edible fungus mites?
- Open Inoculation Technology of Edible Fungi
- Is there any clever way to use fertilizer for edible fungus in winter?
- What agents are used to kill the pathogens of edible fungi in the mushroom shed?
- Rapid drying of Edible Fungi