How to manage pear trees after grafting
Grafting is to artificially connect the branches or buds and other tissues of one plant to the appropriate parts of the branch, stem or root of another plant, so that it can heal and grow together to form a new plant. This branch or bud is called "scion", and the plant bearing scion is called "rootstock". Grafting is indicated by the symbol "+", that is, rootstock + scion; it can also be expressed as "/", but its meaning is opposite to that of "+". Generally, the scion is placed before "/". If gold is grafted on a mountain pear, it can be expressed as "gold / mountain pear", or "mountain pear + gold".

So, how to manage pear trees after grafting? The following is to explain the key points of management techniques after pear grafting:
1. Timely rebinding: check at any time within half a month after grafting, and timely mending of the membrane pecked by birds or unbound buds, so as to avoid dehydration and death.
2. Auxiliary membrane breaking: in the first ten days of May, most of the grafted buds grafted by abdominal grafting grow out of the broken membrane. at this time, if there are individual buds that can not break the film, toothpicks can be used to break the film to make the buds grow. Be careful not to break the membrane too early, lest the buds will die due to ventilation.
3. Sprouting: while the buds germinate, the hidden buds on the rootstock also sprout in large quantities. At this time, the sprouts near the docking site should be erased as soon as possible; for the sprouts near the ungrafted site, one should be retained, the rest should be erased, and the replacement should be carried out between June and August.
4. Binding, removing film and opening angle: when the new tip grows to 30cm, it should be bound and fixed with a bamboo rod to make it grow upright. After that, with the lengthening of the new shoots, they continued to be bound and fixed for 3 times. In the first and middle of June, the plastic film bound to the bud during grafting was released. From late June to early July, when the new shoot grows to 80-120cm, the bamboo rod is used to bind the branches at an angle of about 50 degrees to facilitate the flowering of the branches.
5. Set up the grid: the high-grafting excellent pear tree adopts the happy tree shape and grid type plane production and cultivation technology. The height of the grid is 2.1m, the steel concrete rod is used for the support, the steel strand structure is adopted above, and the grid size is preferably 50 × 50cm.
6. Spraying pest control: it is most vulnerable to be harmed by pests in early spring from grafting to germination, so it is necessary to spray in time.
7. Check survival, unbinding and regrafting: 7-15 days after grafting, the survival can be checked, the bud is fresh and the petiole falls at the touch of the petiole. The graft needs to wait for a certain amount of growth after the scion sprouting to determine whether it will survive or not. Those who survive should be unbound in time, and those who do not survive should be reattached above or under them.
8. Shearing rootstock: in late summer and autumn, the rootstocks above the budding stock should be cut off in time before budding in the following spring, in order to promote budding, and then cut the rootstock in spring, and unbind the rootstock 10 days after budding in summer. When cutting the anvil, the blade of the pruning shears should be facing the side of the bud and cut off at the 0.3~0.4cm on the bud. The cut is slightly tilted to the back of the bud, which is beneficial to the healing of the cut and the germination and growth of the bud, but the cut should not be too low to prevent injury to the bud.
9. De-sprouting: many tillers will occur at the base of the rootstock after cutting the rootstock, which must be removed in time so as not to consume nutrients and water. Remove the wound on the seedling caused by the party, which affects the quality of the seedling.
10. Supplementary grafting: it should be checked in time after 10 days of grafting, and those that did not survive should be repaired in time.
11. Unbind and unbind: generally, when the new tip grows to 30cm, it should be untied in time, otherwise it is easy to form constriction and wind break. If the wound has not healed, it should be re-tied and re-examined 1 month later until the wound has fully healed and then all of it will be lifted.
12. Set up a support: when loosening for the first time, tie a stick with a diameter of 3cm and a long 80~100cm to the rootstock, and tie the new tip to it at the upper end, and tie a stick to each joint to prevent the wind from breaking. By using the method of abdominal grafting, the new shoot can be directly attached to the living pile.
13. Shaping in the nursery: the semi-mature seedlings of some tree species and varieties will germinate secondary shoots or multiple shoots during the growth period after germination. for example, peach trees can germinate 2 or 4 times in the same year. Auxiliary shoots can be used for plastic surgery in the nursery to cultivate high-quality shaped seedlings.
14. Heart-picking: heart-picking at the end of August to promote the maturity of new shoots and improve cold resistance.
15. Other management: young trees should be fertilized once in the middle and late May, tall trees should be fertilized after the new shoots stop growing in autumn, and all types of grafted trees should be sprayed (0.3%KH2PO4) 2 times from August to September, which is helpful to prevent overwintering and the formation of female flowers in the next year, and at the same time, do a good job in soil management and control weeds.
Time: 2019-05-31 Click:

- Prev
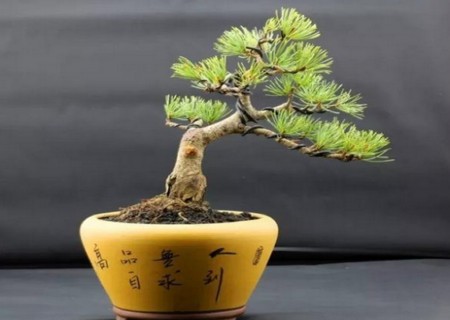
What about the yellow leaves of mountain pine bonsai?
Mountain pine is deeply loved by people because of its rugged and simple tree stalks and its green evergreen posture. But everyone may have such an experience, in a piece of green flowers and trees, there are one or more yellowed pine leaves, it appears to be very eye-catching, very incongruous. Why under the same natural conditions and the same mode of management
- Next
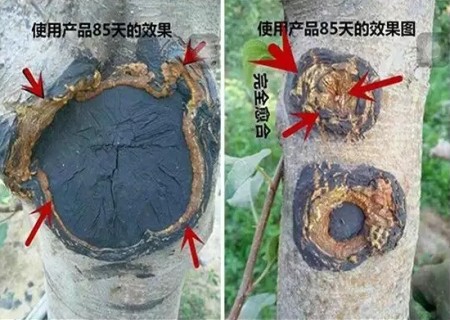
Treatment of poor healing of pear grafting ring peeling
Pear trees are generally girdled on main branches, side branches and overgrown branches. When peeling, it is appropriate to cut 2-3 times in a spiral way. When girdling, we should strictly control the peeling width without harming the xylem, the width should be less than 10% of the branch diameter, and the widest width should not exceed 1.0cm. From May to July, too late is not conducive to wound healing.
Related
- Fuxing push coffee new agricultural production and marketing class: lack of small-scale processing plants
- Jujube rice field leisure farm deep ploughing Yilan for five years to create a space for organic food and play
- Nongyu Farm-A trial of organic papaya for brave women with advanced technology
- Four points for attention in the prevention and control of diseases and insect pests of edible fungi
- How to add nutrient solution to Edible Fungi
- Is there any good way to control edible fungus mites?
- Open Inoculation Technology of Edible Fungi
- Is there any clever way to use fertilizer for edible fungus in winter?
- What agents are used to kill the pathogens of edible fungi in the mushroom shed?
- Rapid drying of Edible Fungi