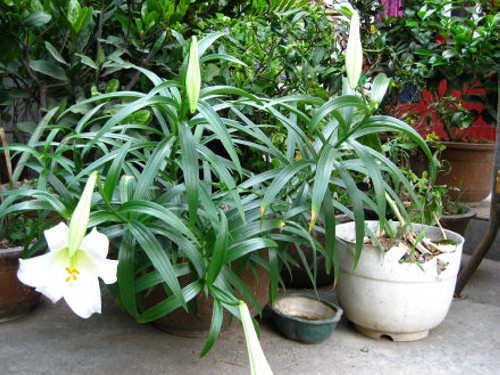
Planting techniques of Musk Lilium (methods)
Musk lily is a kind of beautiful flowers, flowers are very fragrant, contain aromatic oil, can be used as spices, but also a light and elegant, fragrant cut flowers, can be arranged flower beds, flower mirrors, garden sketches or potted plants, can also be used for decoration. Musk lily is mainly used as cut flowers and Easter potted flowers in Europe and America. It has almost become an indispensable flower for Easter. Therefore, it is widely cultivated in European and American countries. The cultivation level is also very high. However, the cultivation of musk lily requires certain skills. Let's learn the cultivation techniques of musk lily together.
[Preparations]
1. Soil disinfection: soil disinfection should be carried out before planting lily. The commonly used disinfection methods include steam disinfection and chemical disinfection. Steam disinfection is rarely used at present because of its high energy consumption and troublesome operation. Chemical disinfection is to use 40% formalin to prepare 1:50 or 1:100 times liquid medicine to sprinkle the soil, the dosage is 2.5 kg/square meter, after sprinkling, cover with plastic film for 5-7 days, open and dry for 10-15 days, then plant, or sprinkle 8-10g/m2 carbendazim raw powder into the soil for disinfection.
2. Thawing and disinfection of seed balls: immediately open the package and put it in an environment of 10-15℃ for thawing after arrival of seed balls, and disinfect it after complete thawing. Disinfection method: Put the seed ball into 1/1000 of chlorothalonil, carbendazim, potassium permanganate and other aqueous solutions for 30 minutes, or put the seed ball into 80 times of 40% formalin solution for 30 minutes, take it out and rinse the residual solution on the seed ball with clean water, and then dry it in a cool place before planting. In some planting bases in China, the original basal roots are cut off before planting, which is conducive to promoting new basal roots.
3. Storage of seed balls: If the thawed seed balls cannot be planted immediately, they cannot be frozen again, otherwise there is a danger of freezing damage, and they can be stored at 0-2 ° C, but they can only be stored for up to two weeks; they can also be stored in 2-5 ° C environment, and they can be stored for up to one week. At the same time, plastic film packaging must be opened.
[Planting method]
Selection of land preparation: it is advisable to choose high dry terrain, sunny, deep soil layer, loose soil, good drainage of sandy soil or humus loam planting; mountain areas, optional semi-shady semi-sunny sparse forest or gentle slope planting. After selecting the land, deep plough the soil more than 25 cm before planting. Combined with soil preparation, apply decomposed manure or compost 2000 kg per mu, calcium superphosphate 25 kg as base fertilizer, and add 50% subagricultural 0 . 6 kg, turned into soil at the same time, soil disinfection. Then, fine rake flat width 1 . 3 meters high or flat ridge, ridge width 30 centimetres. Deeper drainage ditches should be dug around to facilitate drainage.
Planting: Autumn planting is good. In the south it takes place from late September to early October; in the north it takes place in early September. Before planting, the bulblets obtained by the above propagation method are selected, and the bulblets with tight scales, white color and normal shape, no damage and pest damage are better. After selection, the seed stems are soaked in 2% formalin solution for 15 minutes for disinfection, and then taken out and dried for planting. In the whole good ridge surface, according to the row spacing of 25 cm open horizontal ditch, about 12 cm deep, however, every 15 cm (plant spacing) put into the bulb (planting) 1, top up, cover fine planting is planting tight, hug flat ridge surface, cover a layer of fallen leaves, with dead branches compacted, in the next spring germination when removed. The amount of seed used per mu is 150 ~200 kg.
[Post-planting management]
1. Intertill weeding and fertilizing. In the second year after planting, carry out the first intertillage weeding after the spring seedling, and it is advisable to hoe shallow and not hurt the bulbs. Combined with weeding, topdressing once, apply decomposed human and animal manure 1000kg, calcium superphosphate 20kg and compost 800kg per mu, mix evenly, apply in furrows, cover soil. For the second time, 500kg decomposed cake fertilizer water, 20kg calcium superphosphate and 800kg compost were applied in furrows before flowering in May. The third time after July flowering, combined with weeding and then topdressing phosphorus, potassium fertilizer, a little larger, the same method as the first time. Each fertilization should avoid direct contact between fertilizer solution and seed stem, so as not to cause bulb rot.
2. Picking buds. In addition to planting land, in May to June when the bud, timely cut flower scape, so that nutrients concentrated in bulb growth, conducive to yield.
3. Drain water. Lily afraid of waterlogging, summer high temperature rainy season and heavy rain after timely drainage ditch, so as to avoid disease. In dry weather, irrigation should be timely.
[Collection and Processing]
1, harvest: should be transplanted in the second year before and after the beginning of autumn, when the stems and leaves wither, choose sunny day to dig. Remove soil, stems, and fibrous roots, leaving large bulbs for commercial use and small bulbs for seed use.
2. Processing: First peel the big bulbs into pieces, put them in large, medium and small places respectively, wash the soil and drain the water drops. Then, put it into boiling water and blanch it for about 10 minutes; small pieces for 5~7 minutes, cook until the edges are soft, and when there are tiny cracks on the back, quickly remove them, rinse them in clean water to remove mucus, and immediately spread them thinly on the sun mat. Do not turn them at will when they are not dry, so as not to break them. Put it in the house at night and spread it evenly to dry. Do not stack it. The next day out of the sun, sun two days later can turn 1, sun to 9 into dry, fumigate with sulfur, and then repeat the sun to dry. In case of rainy days, it can be dried with warm fire.
Time: 2019-05-25 Click:

- Prev
How to grow safflower sorrel? Planting method of Carthamus tinctorius
In April, in every corner of the campus, especially in the main building, everyone must have noticed the patches of red flowers on the lawn or the mound in the corner. They broke out of the earth in the April sun, with small red heads on the green leaves. It is the protagonist we push today, safflower sorrel. Right
- Next
How to plant the seeds of zinnia
Zinnia is an annual flower with a long flowering period and can bloom for about 100 days. Hundred-day grass can bloom from early summer to autumn, for people to enjoy for a long time, so there is the name of hundred-day grass, as well as the name of long-lasting grass. Seeing the beautiful posture of the hundred-day grass, I can't help thinking of my friends from afar, and the flower words come from this.
Related
- Fuxing push coffee new agricultural production and marketing class: lack of small-scale processing plants
- Jujube rice field leisure farm deep ploughing Yilan for five years to create a space for organic food and play
- Nongyu Farm-A trial of organic papaya for brave women with advanced technology
- Four points for attention in the prevention and control of diseases and insect pests of edible fungi
- How to add nutrient solution to Edible Fungi
- Is there any good way to control edible fungus mites?
- Open Inoculation Technology of Edible Fungi
- Is there any clever way to use fertilizer for edible fungus in winter?
- What agents are used to kill the pathogens of edible fungi in the mushroom shed?
- Rapid drying of Edible Fungi