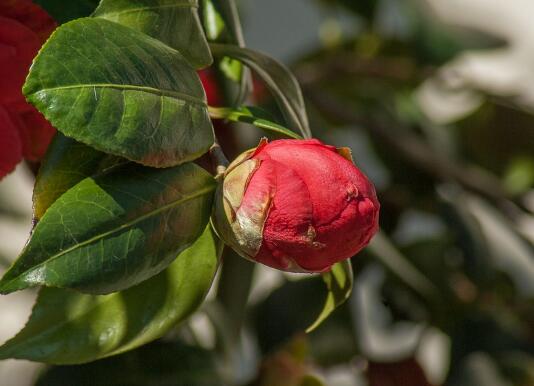
How to grow camellias? Culture methods and matters needing attention of Camellia
Camellia, also known as camellia, is one of the top ten traditional famous flowers in China. The leaves are green and glossy, evergreen all the year round, the flowers are large and colorful, the flower patterns are rich, and the florescence is long. It is an excellent garden beautification and interior decoration flower. So, what are the cultivation methods of camellias? What should be paid special attention to in the process of breeding? Let's find out together.
I. Culture methods of camellias
1. Soil selection
Camellias usually like the hot and humid environment, not too picky soil, but it is best to use fertile, humid, well-drained acidic soil (PH value 5-6.5), summer is not dry and close to alkaline soil.
two。 Fertilizer and Water Management of Camellia Culture
Camellia prefers fertile, loose and slightly acidic loam or humus. Its pH value is 4.5 and 6.5, which requires good drainage and no stagnant water to avoid rotting roots. But it requires high air humidity, avoid dryness, annual precipitation above 1200mm, as long as timely drainage after heavy rain, can grow well. Therefore, camellia seedlings and cultivation process should be often watered to keep the soil and air moist. It is required to replenish fertilizer for many times and low concentration, and do not apply fertilizer with high concentration and high dose.
Do not make it particularly dry in summer, but water it every day. In order to make the flowerpot not dry, irrigation is better. In the case of potted plants, camellias form buds but do not blossom or even drop buds, which is caused by lack of water, so it is necessary to spray frequently when setting flowers to improve humidity to prevent falling flowers.
In winter, organic fertilizer and chemical fertilizer are mixed and applied as base fertilizer. Fertilizers of the same composition are applied during flower bud differentiation.
3. Pot maintenance of Camellia Culture
Potted camellias should use mud pots, especially young camellias. The basin soil can be prepared with 6 parts of rotten leaf soil, 1 part of cake fertilizer residue, 3 parts of sandy loam, or 3 parts of rotten leaf soil, 4 parts of sandy loam and 3 parts of compost. The upper basin should be carried out in early spring from March to April or from late September to early October. When planting, the basin bottom should be covered with broken tiles to facilitate drainage and not to apply base fertilizer so as not to burn the new root.
Small soil ball cuttings were planted in the pot when they were put on the pot. Pour water through after planting, take the exudate from the bottom of the basin as standard, place in a ventilated shade. Pay attention to humidity, cover the plastic bag if necessary, and the temperature in the bag should not exceed 25 ℃, otherwise it will be difficult to survive. 8: 10 days later. Place in a ventilated and half-shaded place. Watering during the growth period should be according to the seasonal changes, in order to keep the basin soil moist as the principle, too dry and too wet are not conducive to plant growth.
In the period of growth and germination, the amount of water should be increased gradually. After the new shoots stopped growing (about late May), watering should be properly controlled to promote flower bud differentiation. In the rainy season, it is necessary to prevent the pots from accumulating water and rotting roots. The high temperature in summer should be watered once in the morning and in the evening, and sprayed around the plant to increase air humidity. High-rise residents can put it in the living room or corridor for the summer. move to the balcony before 9: 00 a. M. or after 5: 00 p. M.
When the plant enters the dormant period in winter, the watering times should be reduced, and the forced fertilizer should be mainly rotten and dilute liquid fertilizer, and the application of concentrated fertilizer and raw fertilizer should be avoided. Liquid fertilizer dominated by nitrogen fertilizer was applied once every 10 days in early spring. For 1 or 2 times in a row, the branches and leaves were promoted. From May to August, fertilizer with the combination of nitrogen and phosphorus and dominated by phosphorus was applied every month to promote flower bud differentiation. Attention should be paid to proper fertilizer control in rainy days. Fertilizer mainly composed of phosphorus and potassium was applied from September to October to promote the further growth of flower buds.
4. Propagation methods of Camellia Culture
(1) grafting propagation of camellia.
The survival rate is high and the size of the rootstock is not limited by the method of grafting with large rootstock. After that, the tree grows fast and the tree forms early. A rootstock can be grafted with multiple branches and buds, and on larger rootstocks, multiple varieties can be grafted at the same time, which has good ornamental value. Grafting takes a long time and can be carried out in all growing periods except florescence.
White flower or safflower Camellia oleifera with vigorous growth and no diseases and insect pests were selected for ① rootstock, and the thickness of the grafting site was above 1cm.
For ② scion, it is better to select the buds with full and sturdy shoots, which are about 10~15cm in length and retain the upper 1-3 leaves. If the number of grafting is large, the scion can be put into the basin or bucket in time, sprayed with water, and then covered with a wet towel to keep the scion moist. The scion must be moderately old and tender, and it is not easy to survive if it is too old or too young.
③ grafting first selects a smooth surface in the appropriate part of the rootstock, and uses the grafting knife to cut the growing 3-5cm surface in the phloem. Then cut a knife between the straighter phloem and xylem of 3~5cm above the base of the scion, the length of which is slightly smaller than that of the rootstock, and try not to damage the xylem. Then align the two into layers, bind them with thin film, cover the upper part of the scion with a plastic bag, cover the base with glass bottles and plastic bottles containing clear water, and soak the scion in water for about 2-3cm. Keep the base of the scion submerged in water within 30 days after grafting to prevent water loss and defoliation and keep the water quality clean. It usually blossoms in the second year after that.
④ interface waterproof due to the rough surface of the scion, it is easy to absorb water and wet the interface, affecting the healing. The moisture-proof method is to apply a 0.5cm wide vegetable oil, wax or paint between the lower part of the interface and the water bottle.
One month after ⑤ grafting, if the buds are full and the leaves are green, it means that the grafting has survived. After 45-60 days, the plastic bag can be removed, and the water bottle can be removed in another week. At the same time, the "tail" under the interface and the rootstock on the upper part of the interface can be cut off and untied properly. After 3 months, you can unbind completely, but not too early, otherwise it will affect your survival.
(2) Cuttage propagation of camellia
It is suitable for horticultural varieties which are suitable for rooting.
In order to adapt to the local environment, ① cuttings were cut from the local camellia plants that had been growing for many years. The longer the local growth time is, the more stable the performance of adapting to the local environment is, and the easier it is to cultivate the camellia seedlings.
Due to the influence of the northern environment, the physiological properties of camellias have changed, which has changed the inherent growth habits to a great extent, and basically adapted to the local soil and water, climate and so on. Cuttings should be cut to take the top 4-5 nodes, long 8cm or so, along with cutting off the lower leaves, the upper leaves to retain 2 cut half of the leaves, and then cut into the pot.
② cuttage time is in the middle and last ten days of June, when most of the annual branches are lignified or semi-lignified, the nutrition is rich, the meristematic ability of cutting is active, the regeneration ability is strong, the callus is fast, the root is fast, and it is easy to survive.
The soil basin with large bottom hole is selected in the ③ cutting substrate cutting basin, and the bottom hole is covered with double-layer gauze before loading. Pure rotten leaf soil is selected for cutting soil, which is breathable and slightly acidic, so it is suitable for camellia to take root and grow. Before cutting, the potted soil is thoroughly scalded with boiling water and sterilized.
④ cutting method first punches holes with small bamboo sticks to avoid scraping the cortex of the cuttings. The spacing should be that the leaves do not block each other. Immediately after insertion, spray it thoroughly with cold boiled water, and the drainage from the bottom hole of the basin shall prevail.
II. Matters needing attention in camellia culture
1. Be careful not to expose camellias to the hot sun
Camellia is a half-yin and half-yang environment, like warm and humid. The optimum temperature for camellia growth is 15-25 ℃, so it is suitable for planting in areas with semi-overcast or astigmatism in summer, full light in the south and wind barriers in the north. Spray water mist on and around the branches and leaves at high temperatures in summer to cool down and prevent dryness. Shading should be carried out from June to September.
two。 Be careful not to change the direction of the camellias at will
The adaptability of camellias is poor, and the orientation of camellias can not be changed at will during the period of budding and budding from April to September, so as to avoid the leaves on the shady side suddenly wither and fall in contact with strong light.
3. Be careful not to cultivate camellias in alkaline soil
The root flesh of camellia is fragile, so it is necessary to use slightly acidic soil with loose soil and good drainage. Clayey and alkaline soil are not suitable, let alone calcareous soil. And the basin soil had better be changed once in 2023, pay attention to the base fertilizer at the bottom of the basin when changing the basin, and a small amount of superphosphate can be used, such as hair, bone powder, chicken feathers, birds and so on. It is better to choose the time to change the basin between "Rain Water" and "the Beginning of Summer".
4. Be careful not to water the camellias too much and apply too much fertilizer
Camellia is a fleshy root, too much water is easy to rot roots, must be appropriate. Water the leaves twice a day during drought and high temperatures. Camellia like fertilizer, in addition to flowering, usually can be thin fertilizer frequently, but do not apply too thick fertilizer, otherwise it is easy to hurt the roots and cause the plant to be burned to death. The fertilizer is mainly phosphorus and potassium fertilizer, followed by nitrogen fertilizer, and it is better to mix seven minutes of water with one-third of rotten cake fertilizer, chicken manure or human manure. It is applied once every 20 days in summer and autumn to make the camellias grow vigorously and the plants are strong.
III. Control of diseases and insect pests in camellia culture
1. Camellia leaf macula
Symptoms: Camellia leaf yellow spot may be a whole plant disease infected by virus. In the early stage of the disease, there are less obvious mottled symptoms of uneven color on the leaves, which are faded green or grayish white, and then gradually show dark yellow mottled or color spots, and the patches are brightly colored. The mottled shape is irregular and varies in size, and the edge of the spot is extremely obvious. The petals of camellias are sometimes mottled or marbled. The leaves of the damaged plants became thinner, the chlorophyll decreased and the growth potential weakened.
Prevention and cure method: ① avoids cutting with diseased plant branches, and cannot use diseased plant as rootstock or collect scions. When ② found the diseased plant, it was removed and destroyed immediately. At ordinary times, ③ can be prevented and treated with virus spirit, virus clear and other agents to prevent and cure virus diseases.
two。 Camellia algal spot
Symptoms: Camellia algal spot can occur on leaves and young stems of camellia. Pathogens can invade the front and back of leaves, but most of them are positive. At the beginning of the damaged leaves, the needle-shaped dots appeared in gray-white to yellow-brown dots, sometimes slightly cross-shaped, and then gradually radiated around, forming round slightly raised felt spots, irregular edges of the disease spots, grayish green or dark brown, with fibrous fine lines on the surface, 2mm in diameter, darker color in the later stage, and a smooth surface. Reddish-brown hairy peduncles appeared in the affected part of the twigs, and the disease spot was long and oval. When the twigs were seriously infected, the branches withered and died.
Control methods: ① strengthen cultivation management, reasonable fertilization, timely pruning, remove diseased branches and leaves, avoid excessive shading, maintain ventilation and light, and improve plant resistance. During the ② growing season, 0.5%-0.7% Bordeaux solution can be sprayed, or the leaves can be sprayed with 2% potassium chloride and then 0.25% copper preparation for better control effect.
3. Camellia gray leaf spot
Symptoms: camellia gray spot mainly harms leaves, but also damages new shoots. In the early stage of the disease, needle-shaped dots of light green or dark brown appeared under the leaves, which gradually expanded into round, semicircular or irregular spots, from brown to black, and in the later stage, the center became grayish white, the edge was reddish brown, and slightly raised. There is a clear boundary between the disease and the surrounding healthy tissue. Sometimes several disease spots are connected to each other and account for most of the leaves, which produce thick black dots, and when they are wet, they overflow black sticky matter from the black grains, that is, the conidia pile of the pathogen. The seriously diseased leaf tissue is ruptured, fragmented and even shedding and perforating. The new shoots are susceptible to brown water-stained stripes, generally 3-4 mm long, sometimes up to 10-30 mm, constricted, sunken, with discontinuous longitudinal cracks, and finally, the diseased tips often fall off from the base.
Prevention and treatment: ① potted flowers should not be placed too dense to avoid increasing friction and causing wounds. During the peak period of disease, watering should not be irrigated from the top of the plant, but should be irrigated from the edge of the basin to reduce the humidity of the leaf surface. ② removes withered branches and leaves in autumn and winter. Remove diseased branches and leaves in time during the growing season and burn them centrally. ③ was sprayed with 150x solution of high lipid membrane or 1000x solution of 50% Dysenamine for 3 times 4 times in a row.
Time: 2019-04-13 Click:

- Prev
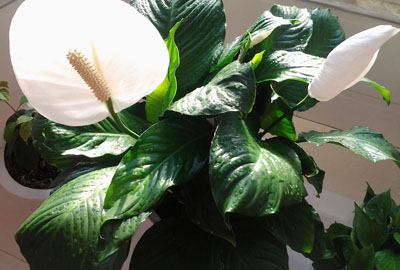
It's plain sailing. How to keep it? What do you need to pay attention to?
Plain sailing is not only a blessing for the Spring Festival, but also the title of a plant. Its leaves are long oval-lanceolate, acuminate at both ends, and the veins are obvious. It is one of the plants widely planted in the courtyard or indoors. What matters should be paid attention to when breeding? Reproduction
- Next
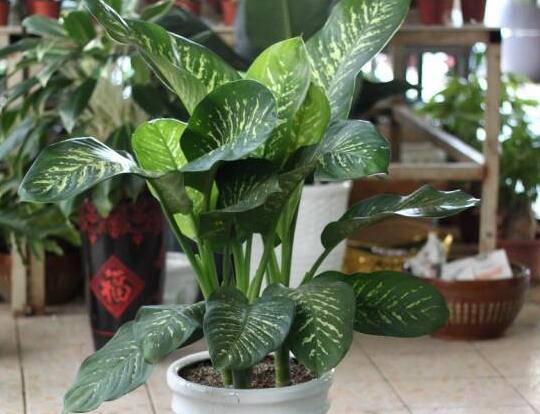
How to raise evergreen? Breeding methods and matters needing attention of evergreen
Evergreen is often planted with pine and auspicious grass to express the meaning of auspicious evergreen. The Chinese people are particularly fond of the evergreen with the meaning of good luck. In China's traditional decoration, there is often a pattern composed of evergreen and Ganoderma lucidum grass, which means that everything is smooth and satisfactory, that is, all the best. So how to raise evergreen?
Related
- Fuxing push coffee new agricultural production and marketing class: lack of small-scale processing plants
- Jujube rice field leisure farm deep ploughing Yilan for five years to create a space for organic food and play
- Nongyu Farm-A trial of organic papaya for brave women with advanced technology
- Four points for attention in the prevention and control of diseases and insect pests of edible fungi
- How to add nutrient solution to Edible Fungi
- Is there any good way to control edible fungus mites?
- Open Inoculation Technology of Edible Fungi
- Is there any clever way to use fertilizer for edible fungus in winter?
- What agents are used to kill the pathogens of edible fungi in the mushroom shed?
- Rapid drying of Edible Fungi