Two-color jasmine picture culture methods and matters needing attention of two-color jasmine
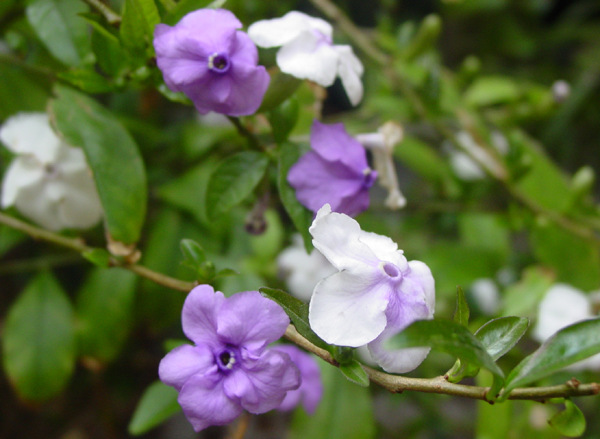
What a beautiful jasmine, what a beautiful jasmine, fragrant and beautiful full of shoots. About the song about jasmine, you can know how beautiful jasmine is. Two-color jasmine, also known as mandarin duck jasmine, five-color jasmine, pan jasmine. Because of the sequence of flowering, flowers of different colors can be seen on the same plant at the same time, so it is named "bicolor jasmine", which means "yesterday, today and tomorrow" in English, which vividly describes the special changes of its flower color. The floret is dark blue at first (yesterday), then light purple (today), and finally white (tomorrow). Next, the editor of the net will introduce the two-color jasmine.
Two-color jasmine picture culture methods and matters needing attention of two-color jasmine
Mode of reproduction
Sowing and reproduction
Seed selection: first of all, the seeds should be selected before sowing. Whether the seeds are good or not is directly related to the success of sowing. 1. It is best to choose the seeds harvested in the same year. The longer the seed is preserved, the lower the germination rate is.
2. Choose full seeds without defective or deformed seeds.
3. Select the seeds free from diseases and insect pests.
Disinfection: disinfection includes two concepts, one refers to the disinfection of seeds, and the other refers to the disinfection of sowing substrates. Families usually soak the seeds in hot water for about 60 ℃ for a quarter of an hour, and then use warm hot water to accelerate germination for 12 to 24 hours. The best way to disinfect the substrate used for sowing is to stir-fry it in a pan so that any diseases and insects can be scalded to death.
Sprouting: soak the seeds in warm hot water (the temperature is about the same as facial wash) for 12 to 24 hours until the seeds absorb water and expand. For common seeds that germinate easily, this work does not have to be done.
Sowing: for small seeds that are difficult to pick up with hands or other tools, wet one end of the toothpick with water, stick the seeds one by one on the surface of the matrix, cover the substrate 1 cm thick, and then put the seeding flowerpot into the water, the depth of the water is the height of the flowerpot, let the water soak up slowly (this method is called "pot immersion method") For larger seeds that can be picked up by hand or other tools, put the seeds directly into the substrate and order them at a distance of 3 × 5 cm. After sowing, the substrate was covered, and the thickness of the cover was 2-3 times that of the seed. After sowing, the sowing matrix can be wet with sprayers and fine-hole showers, and later, when the pot soil is slightly dry, we should still pay attention to watering so as not to wash up the seeds; management after sowing: after sowing in late autumn, early spring or winter, when there is a cold wave and low temperature, the flowerpot can be wrapped with plastic film for heat preservation and moisture preservation. After the seedlings are unearthed, the film should be opened in time, and the seedlings should be exposed to the sun before 9:30 every morning or after 3:30 in the afternoon, otherwise the seedlings will grow very weakly; after most of the seeds come out, you need to plant seedlings properly: pull out the diseased and unhealthy seedlings so that there is some space between the seedlings left behind. When most of the seedlings have three or more leaves, they can be transplanted.
Cuttage propagation
It is often used for softwood cutting in late spring and early autumn, or old wood cuttings with annual branches in early spring.
Cutting substrate: is used for cutting nutrient soil or river sand, peat soil and other materials. Due to the limited conditions, it is difficult to get the ideal cutting substrate, so it is recommended to use the prepared and sterilized cutting substrate; medium and coarse river sand is also fine, but rinse with clean water several times before use. Do not use sea sand and river sand in saline-alkali areas, they are not suitable for the growth of flowers and plants.
Selection of cutting branches: when the tender wood cuttings were carried out, the sturdy branches of the current year were selected as cuttings when the plants were growing vigorously from the end of spring to early autumn. After cutting off the branches, select the sturdy parts and cut them into segments 5-15 cm long, each with more than 3 leaf nodes. When cutting cuttings, it should be noted that the upper cut is cut flat at about 1 cm above the uppermost leaf node, and the lower cut is about 0.5 cm below the lowest leaf node, and the upper and lower cut should be flat (knife should be sharp).
When hardwood cuttings are carried out, after the temperature rises in early spring, the robust branches of the previous year are selected as cuttings. Each cuttage usually retains 3-4 nodes, and the cutting method is the same as that of softwood cuttings.
Management after cutting:
Temperature: the optimum temperature for rooting of cuttings was 20 ℃ ~ 30 ℃, which was lower than 20 ℃, and the rooting of cuttings was difficult and slow. When the temperature was higher than 30 ℃, the upper and lower cuttings were easily infected and rotted by bacteria, and the higher the temperature was, the greater the proportion of rot was. When there is a low temperature after cutting, the heat preservation measure is mainly to wrap the flowerpot or container used for cutting with thin film; when the temperature is too high after cutting, the cooling measure is mainly to shade the cuttings, to cover 50-80% of the sun, and at the same time, spray the cuttings 3-5 times a day, with more times of spraying when the temperature is higher in sunny days, lower temperatures and higher temperatures in rainy days, but less or no spraying times.
Humidity: the relative humidity of the air must be kept at 750.85% after cutting. The basic requirement for cuttings to take root is to ensure that cuttings are fresh and tender and can be used to produce rooting substances before they take root. However, cuttings without rooting can not absorb enough water to maintain their water balance, so it is necessary to reduce the water evaporation of cuttings by spraying: under shaded conditions, the cuttings are sprayed 3-5 times a day. The higher the temperature in sunny days, the more the times of spraying, the lower the temperature in cloudy and rainy days, the less or no spraying. But with excessive spraying, cuttings are easy to be infected by bacteria and rot, because many kinds of bacteria exist in the water.
Light: cutting propagation is inseparable from sunlight, because cuttings continue to carry out photosynthesis to produce nutrients and rooting materials to supply their rooting needs. However, the stronger the light, the higher the temperature in the cuttings, the more exuberant transpiration of cuttings, and the more water consumed, which is not conducive to the survival of cuttings. Therefore, after cutting, the sun must be shaded by 50% to 80%, and then gradually removed after the root system grows: remove the sunscreen at 4:00 every sunny day, and cover it before 9:00 the next day.
Striping propagation
Select a strong branch and peel off the bark from about 15cm to 30cm below the top. The width of the peeled wound is about one centimeter, and the depth is limited to just peeling off the skin. Cut a piece of film 10 cm 20 cm long and 5 cm 8 cm wide, put some wet garden soil on it, and wrap it around like a wound. The upper and lower ends of the film are tightly tied and bulged in the middle.
Take root in about four to six weeks. After taking root, cut off the root system along the edge of the branch to form a new plant.
Pot or transplant: when small seedlings are poted or large plants that have been raised for several years are transferred to the basin, a coarse-grained matrix 2cm thick is first put into the bottom of the basin as a filter layer, which is sprinkled with a fully mature organic fertilizer as a base fertilizer, with a thickness of about 1cm and 2cm, then covered with a thin layer of matrix, about 1cm thick, and then put into the plant to separate the fertilizer from the root system to avoid root burning.
You can choose one of the following substrates for potting: vegetable garden soil: slag = 3RV 1; orchard soil: medium coarse river sand: sawdust (dregs) = 4RU 1v 2; or one of paddy soil, pond mud, and rotten leaf soil. Pour water once after putting on the basin and keep it in a shaded environment for a week. When transplanting the seedlings, first dig the planting hole, sprinkle a layer of organic fertilizer at the bottom of the planting hole as the base fertilizer (base fertilizer), the thickness is about 46.6 cm, and then cover a layer of soil and put it into the seedlings to separate the fertilizer from the roots and avoid burning roots. After putting it into the seedling, backfill the soil, cover the root system, and trample the soil with your feet and water it once.
Humidity management: like the humid climate environment, the relative air temperature of the growing environment is 70% to 80%, the air relative humidity is too low, the lower leaves are yellowed and shedding, and the upper leaves are not glossy.
Temperature management: because it is native to the tropics and likes high temperature and humidity environment, it has strict requirements on winter temperature. When the ambient temperature is below 10 ℃, it can not survive the winter safely when the environment temperature is below 10 min.
In the summer:
1. Strengthen the air convection so that the temperature in the body can be released; 2. Put it in the semi-shade, or shade it by 50%
3. Spray it properly, 2 or 3 times a day.
In winter:
1. Move to a brightly lit place for maintenance
2. Outside, you can wrap it with a film to survive the winter, but uncover the film every two days when the temperature is high at noon to let it breathe.
Folded light management
Like the semi-shade environment, in autumn, winter, spring can give enough sunshine, but in summer to shade more than 50%. Put in indoor maintenance, as far as possible in places with bright light, such as well-lit living room, bedroom, study and other places. After indoor maintenance for a period of time (about a month), it should be moved to an outdoor place with shade (heat preservation in winter) for a period of time (about a month), so alternately.
Fertilizer and water management
For potted plants, in addition to adding organic fertilizer when potting, proper fertilizer and water management should be carried out in the usual maintenance process.
Spring, summer and autumn: these three seasons are its peak growing season. Fertilizer and water management circulates according to the order of "Huabao"-- clear water-- "Huabao"-- clear water. The interval period is about 1-4 days, and the interval period is shorter during sunny or high temperature days. The interval period is longer or not watered during rainy days or low temperatures.
Winter: during the dormant period in winter, the main task is to control fertilizer and water. Fertilizer and water management circulates according to the order of "Huabao"-clear water-clear water-"Huabao"-clear water-clear water, with an interval of about 3-7 days. Like other seasons, it needs to be adjusted according to the weather.
For ground-planted plants, fertilizer and water were applied 2 to 4 times in spring and summer according to drought conditions: first, a small trench was opened at 30cm to 100cm outside the root neck (the larger the plant, the farther away from the root neck), the width and depth of the ditch were both 20cm. The ditch is sprinkled with 25-50 jin of organic fertilizer, or 1-5 two-grain compound fertilizer (chemical fertilizer), and then poured with water. After the beginning of winter, before the beginning of spring, fertilize again according to the above method, but do not need watering.
Pruning: when the plant enters the dormant or semi-dormant period in winter, the branches such as thin, disease and insect, withered and overdense should be cut off. The branches can also be arranged in combination with cuttings.
Change the basin: as long as it is properly maintained, it will grow very fast. when it grows to a certain size, it should be considered to change a larger basin to allow it to continue to grow vigorously. The culture soil used for changing basin and the proportion of its components can refer to the culture soil of the upper basin.
Take off the basin: put the flowers that want to change the basin on the ground, first pat the four sides of the basin with a slap, so that the root system is shaken and separated from the basin wall, put the flowerpot upside down on the left hand, gently clamp the plant with the index finger and middle finger of the left hand, hold the edge of the basin with the wrist and fingertip, hit the bottom of the basin with the right hand, and then use the mother finger to top the root soil down from the bottom hole to let the plant come out. After taking it off, gently pat the basin soil with both palms to let the excess soil fall off.
Flowerpot preparation: choose a flowerpot of appropriate size, and the bottom hole of the pot is covered with two tiles or thin foam sheets, not only to ensure that the soil is not washed out by water, but also to allow excess water to flow out in time. A layer of ceramsite or broken red brick is placed on the tile or foam to serve as a filter layer, about 2cm to 3cm thick. On the drainage layer, there is machine fertilizer, which is about 1cm thick, and a thin layer of matrix on the fertilizer, which is about 2cm thick to separate the root system from the fertilizer. Finally, the plant is put in and the nutritious soil is filled, leaving about 2cm from the mouth of the basin.
Key points of cultivation
① mandarin duck jasmine. Like warm, humid climate, not cold-resistant. Acid loam with sufficient sunshine and good drainage is required. You need to spend the winter indoors in winter and move outside in spring.
The ② culture soil can be prepared with garden soil: rotten leaf soil: Rice bran ash (1.5%) and barnyard manure. Prune properly when turning the basin in spring, trimming off old roots, withered branches, dense branches and long branches. It needs to be cultivated under a big tree in summer.
③ can gradually increase the amount of water after spring, and can be watered once every two days in summer. Properly spray water on the leaf surface and the surrounding environment to reduce the number of watering in autumn. In winter, it is usually watered once every 10 days, and too much watering will lead to fallen leaves or root rot.
④ applied pancake fertilizer and water every 10 to 15 days in spring and summer, and stopped fertilization in autumn to prevent new shoots from freezing.
⑤ reproduction. a. Cutting propagation can be in April to August, cut off annual branches, 8-10 cm long, 1 month after cutting can take root. The survival rate of full light spray method is high in summer. b. It can also be propagated by pressing method, and the branches are cut at 15 cm and buried in the soil. They can take root after 3 weeks, and can be transplanted in vitro in 50 days.
What about the yellow leaves of mandarin duck jasmine?
1. Water is yellow. The leaf yellow caused by long-term watering is shown in that the young leaves have no luster, the old leaves have no obvious change, the roots are small yellow-green, the new shoots atrophy is not long, should be watered with restraint, the heavy ones can be removed from the basin, and then put into the basin again after drying the soil in the shade.
2. Dry and yellow. The leaves yellowed due to lack of water or lack of watering. The old leaves are withered and yellow from the bottom up, but the new leaves generally grow normally. The amount of water and times of watering should be increased appropriately.
3. Fat yellow. Due to excessive fertilization or excessive concentration, the new leaf tip appears dry brown, the old leaf tip dry scorch withered yellow shedding, although the general leaf surface is thick and shiny, but mostly uneven. Stop fertilizing or washing the fertilizer with clean water.
4. Lack of fat yellow. Potted flowers only water for a long time, or do not change pots for many years, the roots must form a ball, the plant can not get fertilizer points, so that leaves yellow, in addition to timely change pots, usually should be thin fertilizer diligently.
5. Burning yellow. Like wet potted flowers and foliage plants, such as Cymbidium, evergreen, one-leaf orchid, hairpin taro, etc., such as strong direct sunlight, leaves often appear yellow tip, should be placed in the shade.
6. Alkali yellow. Flowers that like acidic soil, such as rhododendron mast camellia, sweet-scented osmanthus magnolia, etc., such as potted soil or alkaline water quality, often cause leaves to change from green to yellow, or even fall off, except for culture in acidic nutrient soil, alum fertilizer water or 0.2% Laurel 0.5% ferrous sulfate solution can be used to spray the leaves from yellow to green.
7. Damp-hot yellow. Some flowers which are not resistant to high temperature and high humidity are yellowed due to hot summer, bad storm, and improper shade avoidance. Such as hanging upside down Admiralty, cuckoo in the hot and humid environment has this phenomenon, we should pay attention to ventilation and cooling, and basin soil can not be overheated.
8. Albino yellow. Flowers lack of regular light, the chlorophyll in the leaves decreases, so that the green leaves gradually disappear, showing albinism, the plant can be moved to a sunny place, so that the leaves slowly turn green.
9, in the cold winter, such as low indoor temperature, some cold-afraid flowers, such as Magnolia, Guangdong evergreen, poinsettia leaves will also turn yellow and fall off. In addition, flowers harmed by diseases and insect pests can also cause yellow leaves to fall off. It is normal if a few leaves turn yellow and fall off in the lower part of the plant.
Culture methods and matters needing attention of two-color jasmine how to raise two-color jasmine
Two-color jasmine, also known as mandarin duck jasmine, is a kind of Solanaceae, native to the tropics, is one of the best-selling ornamental plants on the market, many people want to raise at home, but do you know how to raise two-color jasmine? Do you know what matters needing attention in breeding bicolor jasmine? If you don't know, take a look at the following editor's specific introduction to two-color jasmine culture. after reading it, we will know how to raise two-color jasmine.
How to raise two-color jasmine
Two-color jasmine this kind of plant can choose cuttage propagation, cut 8 to 10 centimeters of annual branches between April and August every year, to cultivate potatoes, can take root a month later, after rooting, transplant it directly to flowerpot, put it in a cool environment to slow seedling, can survive about a week later, then move it to the sun and put it on display.
Culture method
In short, two-color jasmine should pay attention to temperature regulation, it most likes to grow in an environment of 18 to 30 degrees, and in indoor cultivation, to ensure that there are four hours of sufficient sunlight every day, otherwise it will directly affect its flowering period, when the external temperature reaches 12 degrees, it will go into a dormant state. Usually cultivate two-color jasmine, water regulation is also very important, in summer high temperature weather, should be watered every two days, and to water its leaves, into autumn and winter, after to reduce water supply, every ten days watering can.
Matters needing attention
Bicolor jasmine is a kind of ornamental plant that likes warm and humid climate. Its cold tolerance is very poor. When raising bicolor jasmine, we must pay attention to this and move it to a warm room in winter. In addition, the cultivation of two-color jasmine should pay attention to changing the basin once a year, which can be carried out in spring. When changing the basin, it should be pruned and its old roots and withered roots removed. Only in this way can two-color jasmine grow more vigorously in the new year.
Culture methods and matters needing attention of two-color jasmine
Sowing and reproduction
Seed selection: first of all, the seeds should be selected before sowing. Whether the seeds are good or not is directly related to the success of sowing. 1. It is best to choose the seeds harvested in the same year. The longer the seed is preserved, the lower the germination rate is.
2. Choose full seeds without defective or deformed seeds.
3. Select the seeds free from diseases and insect pests.
Disinfection: disinfection includes two concepts, one refers to the disinfection of seeds, and the other refers to the disinfection of sowing substrates. Families often soak the seeds in hot water at about 60 degrees Celsius for a quarter of an hour, and then use warm hot water to promote germination for 12 hours. The best way to disinfect the substrate used for sowing is to stir-fry it in a pan so that any diseases and insects can be scalded to death.
Sprouting: soak the seeds in warm hot water (the temperature is about the same as facial wash) for 12 to 24 hours until the seeds absorb water and expand. For common seeds that germinate easily, this practice does not have to be done.
Sowing: for small seeds that are difficult to pick up by hand or other harness, wet the end of the toothpick with water, stick the seed-seed-grain to the surface of the matrix, cover the substrate 1 cm thick, and then put the seeding flowerpot into the water, the depth of the water is 1x2cm 2ppm 3, let the water soak up slowly (this method is called "pot immersion")

For larger seeds that can be picked up by hand or other tools, put the seeds directly into the substrate and order them at a distance of 3 × 5 cm. After sowing, the substrate was covered, and the thickness of the cover was 2-3 times that of the seed. After sowing, you can use sprayer and fine hole flower wine to wet the sowing matrix, and later when the basin soil is slightly dry, you should still pay attention to the degree of watering so as not to wash the seeds up.
Management after sowing: after sowing in late autumn, early spring or winter, when you encounter a cold wave and low temperature, you can wrap the flowerpot with plastic film to keep warm and wet.
After the seedlings are unearthed, uncover the film in time, and let the seedlings be exposed to the sun before 9:30 every morning or after 3:30 in the afternoon, otherwise the seedlings will grow very weakly; after most of the seeds come out, you need to plant seedlings properly: pull out the diseased and unhealthy seedlings, so that the seedlings left behind have a fixed space between each other. When most of the seedlings have three or more leaves, they can be transplanted.

- Prev
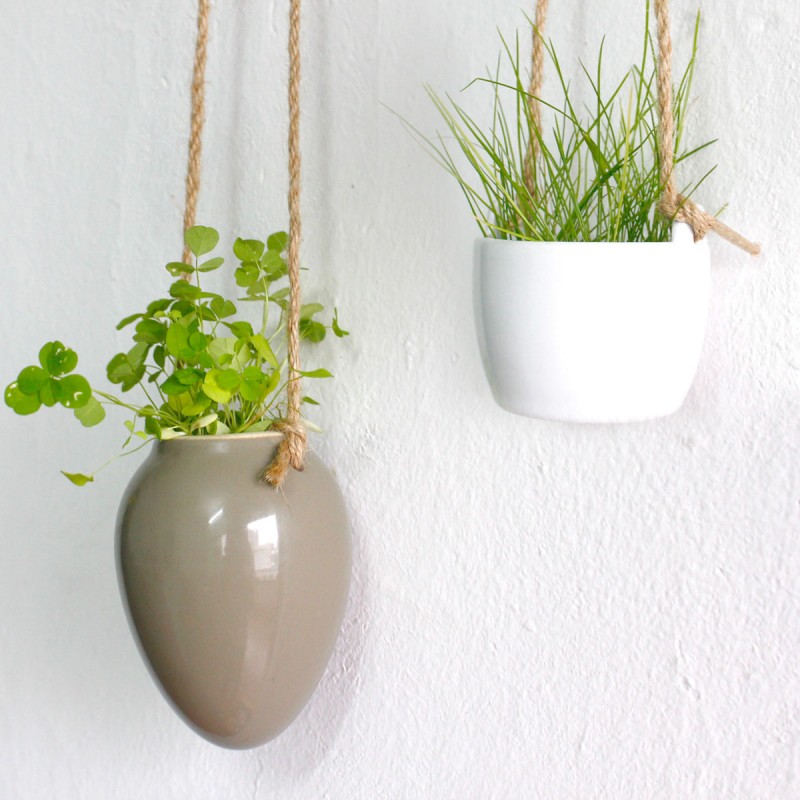
Pictures of hydroponic plants what are hydroponic plants
As the name implies, hydroponics means soilless cultivation and aquiculture in water. Hydroponic culture (Hydroponics) is a new type of indoor soilless cultivation, also known as nutrient liquid culture: its core is to fix the plant rhizome in the planting basket and make the root grow naturally into the plant nutrient solution.
- Next
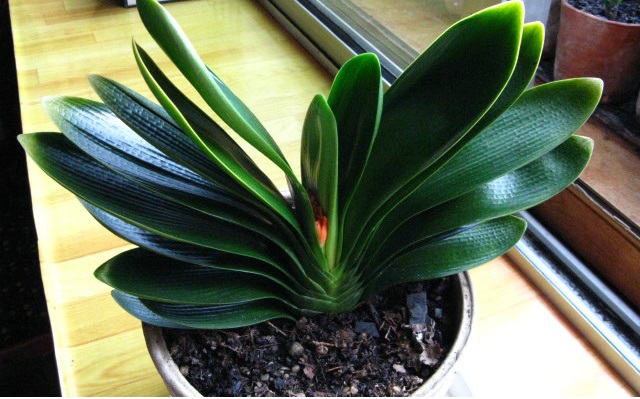
Strange gentleman orchid picture strange gentleman orchid culture method
Magnolia is the sixth type of native species found in South Africa around 2000, and it is a national protected species of South Africa. It was found in the Northern Cape, South Africa. Exotic orchids grow in humus in cracks in the slopes of rocky mountains, either living alone or in groups.
Related
- Fuxing push coffee new agricultural production and marketing class: lack of small-scale processing plants
- Jujube rice field leisure farm deep ploughing Yilan for five years to create a space for organic food and play
- Nongyu Farm-A trial of organic papaya for brave women with advanced technology
- Four points for attention in the prevention and control of diseases and insect pests of edible fungi
- How to add nutrient solution to Edible Fungi
- Is there any good way to control edible fungus mites?
- Open Inoculation Technology of Edible Fungi
- Is there any clever way to use fertilizer for edible fungus in winter?
- What agents are used to kill the pathogens of edible fungi in the mushroom shed?
- Rapid drying of Edible Fungi