How to propagate Cymbidium, two propagation methods / sowing and cutting of Cymbidium
Bottle orchid, is a very ornamental plant, because of its similar appearance of wine bottles, has been loved by many people. In order for it to grow healthily, in addition to mastering the cultivation method of bottle orchid, the reproduction method is also very important. How to breed bottle orchid, in fact, can be roughly divided into two kinds, sowing, cuttage. So what exactly is the method of propagation of bottle orchid? The following small series takes everyone to understand.
I. How does the bottle grow/grow?

The growth environment of bottle orchid will play a great role in its reproduction. The general ambient temperature is 16 - 28℃, which is the best environment. In such a high-quality environment, bottle orchid will thrive. Below we enter the topic, bottle orchid how to reproduce, in fact, can be roughly divided into two categories, one is the seeding reproduction method, one is the cutting reproduction method, about these two kinds of bottle orchid reproduction methods, the following small series to bring you a detailed introduction.
II. The details of the wine bottle are important.
(1)sowing
Selection of seeds: In the breeding method of bottle orchid, sowing is a very important link. The quality of seed selection will directly determine the health of bottle orchid in the future. It is best to choose new seeds every year, and the shorter the preservation event, the better, because the newer the seed, the higher the germination rate of the bottle orchid will be relatively. And when selecting seeds, be sure to check for pests and diseases.
Sowing method: When sowing, first use tools to put on the surface of the substrate, the thickness of the cover is generally about 1cm, put the flowerpot in water, let the water cover half of the flowerpot, let the water slowly soak into it, and the larger seeds can be directly placed into the substrate for covering. The thickness is generally 2-3 times that of the seed, and then you can water it, but don't pour more, just wet the substrate, it's best to choose a watering can when watering, don't pour directly, otherwise it may flush the seed.
(2)cuttage
Temperature management: The temperature of bottle orchid cuttings is best controlled at 20-30 ° C, because if the temperature is too low, it will lead to slow rooting of cuttings, if the temperature is too high, it is easy for bottle orchid to produce bacteria infection, the higher the temperature, the easier it is to infect, so controlling the temperature is very important.
Light management: most plants are inseparable from sunlight, bottle orchid cuttings need photosynthesis, which can create nutrients for plants to take root and sprout. However, the sunlight could not be too strong, which was not conducive to reproduction. It was best to block two-thirds of the sunlight for the best condition.
Humidity and moisture: In addition to the above two points, bottle orchid cuttings also ensure the humidity of the air, humidity between 75%-85% is the best, of course, all this is established after rooting, because if there is no rooting, cuttings are unable to absorb water to maintain the growth balance of the body, so we need to reduce the evaporation of water by spraying.
Bottle-bottle orchid seed propagation
The bottle orchid is generally sown and propagated in late autumn, early spring or winter. It germinates about 20-25 days after sowing. When the seedling is 4-5 cm high, the seedling grows slowly and can be viewed in the second year. After the bottle orchid is sown, when encountering cold wave and low temperature, the flowerpot can be wrapped with plastic film to facilitate heat preservation and moisture retention. After the seedling is unearthed, the film should be uncovered in time, and before 9:30 in the morning every day, or after 3:30 in the afternoon. Let the seedlings receive the sun's light, otherwise the bottle orchid seedlings will grow very weak.
1. Cuttage medium
Potted bottle orchid can be mixed with 2 parts of moldy leaf soil, 1 part of garden soil, 1 part of river sand and a small amount of plant ash as substrate. It is difficult to get ideal cuttage substrate for family cuttage due to limited conditions. Sea sand and river sand in saline-alkali areas should not be used. They are not suitable for the growth of bottle orchid.
2. Cutting time
Bottle orchid cuttings often in late spring and early autumn with the branches of the year for young cuttings, or in early spring with last year's branches for old cuttings.
3. Cutting selection
When carrying out hard branch cuttage of bottle orchid, after the temperature rises in early spring, the healthy branches of last year are selected as cuttings. After cutting off the branches of the bottle orchid, select the sturdy parts and cut them into sections 5 to 15 cm long, each section with more than 3 leaf nodes. Each cutting usually retains 3-4 nodes, and the method of cutting is the same as that of shoot cutting.
When cutting cuttings, it should be noted that the upper cut should be cut flat at about 1 cm above the uppermost leaf node, and the lower cut should be cut obliquely at about 0.5 cm below the lowermost leaf node. The upper and lower cuts should be flat and the knife sharp.
4. Cutting skills
After cutting with lateral branches to form a bottle-shaped trunk is quite slow, can be the stem shape of the bottle orchid is not correct for cutting, buried dry propagation, so that it grows into a new plant. At the same time, attention must be paid to wound disinfection to avoid decay. After cutting off the cuttings and drying them slightly, insert them in the sand bed, increase the air humidity, and root about 15-20 days after insertion.
The breeding method of bottle orchid, the breeding and conservation management of bottle orchid
The bottle orchid has become a popular indoor foliage plant with special shape in recent years. The most ornamental part is the big "bottle" belly and delicate leaves of the bottle orchid, which combines ruggedness and softness perfectly. What is the method of propagation of the bottle orchid, and how does the bottle orchid reproduce? The following small series introduces the breeding method of bottle orchid, how to breed bottle orchid.
The propagation method of bottle orchid
The propagation of bottle orchid generally has two methods: sowing and cuttage. Because bottle orchid blooms very late, it is not easy to harvest seeds, and it is rarely possible to reproduce with self-collected seeds. However, bottle orchid multi-use sowing propagation, domestic has not yet seen the seed, more from the origin of imported bottle orchid seeds. In addition, the bottle orchid that grows for many years sometimes divides small buds at the base of the stem, and can also be divided into buds for cuttage propagation.
Bottle-bottle orchid seed propagation
The bottle orchid is generally sown and propagated in late autumn, early spring or winter. It germinates about 20-25 days after sowing. When the seedling is 4-5 cm high, it grows slowly and can be viewed in the second year. After the bottle orchid is sown, when encountering cold wave and low temperature, the flowerpot can be wrapped with plastic film to facilitate heat preservation and moisture retention. After the seedlings are unearthed, the film should be uncovered in time, and before 9:30 in the morning every day, or after 3:30 in the afternoon. Let the seedlings receive the sun's light, otherwise the bottle orchid seedlings will grow very weak.
After most of the bottle orchid seeds are out, it is necessary to properly thin the seedlings, pull out the diseased and unhealthy bottle orchid seedlings, so that there is a certain space between the seedlings left, and when most of the seedlings grow 3 or more leaves, they can be transplanted.
Cuttage propagation of Cymbidium angustifolium
The bottle orchid sometimes sprouts lateral branches and can be propagated by cuttings, but unlike other agave plants, the bottle orchid will grow many suction buds at the root neck, but only a few lateral branches. Bottle orchid cuttings often in late spring and early autumn with the branches of the year for young cuttings, or in early spring with last year's branches for old cuttings. When cutting shoots, the robust shoots of this year were selected as cuttings when the plant grew vigorously from late spring to early autumn. After cutting the branches, select the sturdy parts and cut them into sections 5 to 15 cm long, each section with more than 3 leaf nodes.
Wine bottle orchid cuttage propagation, must pay attention to wound disinfection, so as not to rot. After cutting off the cuttings and drying them slightly, insert them in the sand bed, increase the air humidity, and root about 15-20 days after insertion. After cutting with lateral branches to form a bottle-shaped trunk is quite slow, can be the stem shape of the bottle orchid is not correct for cutting, buried dry propagation, so that it grows into a new plant.
When cutting cuttings, it should be noted that the upper cut should be cut flat at about 1 cm above the uppermost leaf node, and the lower cut should be cut obliquely at about 0.5 cm below the lowermost leaf node. The upper and lower cuts should be flat and the knife sharp. When carrying out hard branch cuttage of bottle orchid, after the temperature rises in early spring, the healthy branches of last year are selected as cuttings. Each cutting usually retains 3~4 nodes, and the cutting method is the same as that of young cuttings.
Breeding, Conservation and Management of Bottle-bottle Orchid
When planting the bottle orchid, sow the seeds in the matrix mixed with moldy soil and river sand, keep it moist, not too wet, otherwise it will rot easily. The bottle orchid can germinate in 2-3 months at a temperature of 20-25℃ and in a semi-shady environment. In order to enlarge and enrich the stem of Juniperus microphylla, we should strengthen the management of fertilizer and water, apply thin liquid fertilizer frequently and increase potassium fertilizer. The nutrient soil or river sand, clay soil and other materials used for cuttage of bottle orchid cuttage matrix. It is difficult to get ideal cuttage substrate for family cuttage due to limited conditions. Sea sand and river sand in saline-alkali areas should not be used. They are not suitable for the growth of bottle orchid.

- Prev
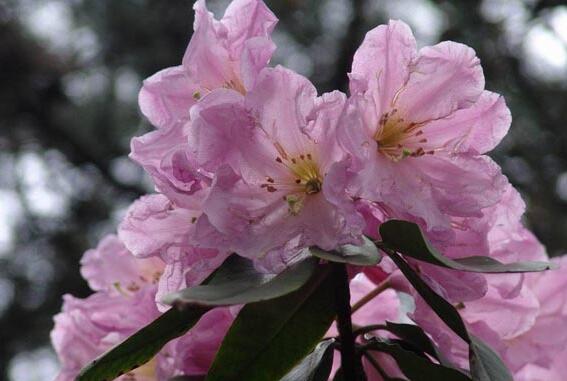
How to reproduce rhododendron, the cutting propagation method of rhododendron / the high survival rate of flowering in the following year.
As one of the top ten famous flowers in China, the name of rhododendron is well known, and its beauty has been deeply rooted in the hearts of the people and has become a symbol of beauty. If we want more places to be full of azaleas, we need to master the method of propagation, so how do azaleas reproduce? It is understood that
- Next
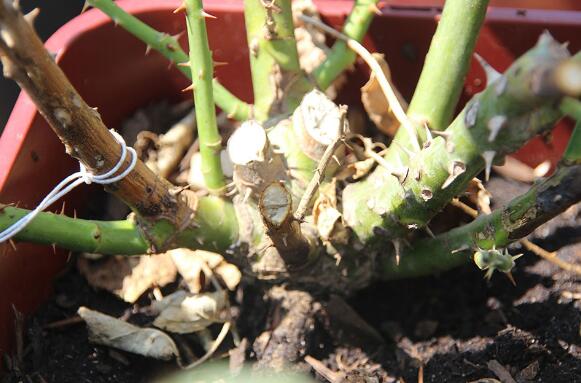
How to reproduce roses? five propagation methods / cutting survival rate of roses is 100%.
Keeping a pot of roses at home is the choice of many people in the metropolis, which not only beautifies the living environment, but also is very pleasing to the eye. Getting up early in the morning to see it will be a very pleasant day. But it will inevitably be monotonous over a long period of time, so it is necessary to raise and breed more pots of roses of different colors.
Related
- Fuxing push coffee new agricultural production and marketing class: lack of small-scale processing plants
- Jujube rice field leisure farm deep ploughing Yilan for five years to create a space for organic food and play
- Nongyu Farm-A trial of organic papaya for brave women with advanced technology
- Four points for attention in the prevention and control of diseases and insect pests of edible fungi
- How to add nutrient solution to Edible Fungi
- Is there any good way to control edible fungus mites?
- Open Inoculation Technology of Edible Fungi
- Is there any clever way to use fertilizer for edible fungus in winter?
- What agents are used to kill the pathogens of edible fungi in the mushroom shed?
- Rapid drying of Edible Fungi