Planting methods of Dutch Chrysanthemum
1. Sowing and reproduction
Sowing time is very fastidious, too early will lose the role of fleshy root, too late will affect the quality of fleshy root, so the best sowing time is from July 25 to August 15, but also in a warm sunny place, the room temperature can not be lower than 15 degrees, and then wait for it to take root and sprout.
2. Tillering propagation
Tillering plants are usually in the spring, dig out the overwintering underground roots, cut them into segments with a knife, and then plant them separately.
3. Cuttage propagation
Cut off the young tiller seedlings with a knife for cutting, and then use plain sand or perlite or vermiculite as the substrate, the temperature is kept above 20 ℃, to maintain air humidity, it can take root in about half a month, and then it can be planted in the basin.
4. Grafting cultivation
Wild Artemisia annua L. is generally used as rootstock for cultivation.
Planting methods of Dutch Chrysanthemum
[FAQ] planting methods of Dutch chrysanthemum
[expert answers]
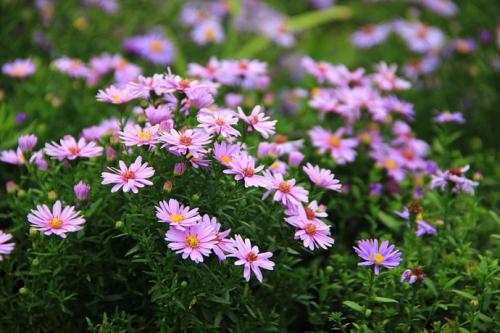
Picture: Dutch chrysanthemum
● site selection: Dutch chrysanthemum is a dry crop, it is necessary to choose plots with convenient transportation and close to water sources. Requires loose texture, fine broken soil, good air permeability, pH6.5~7 sandy soil or sandy loam.
● selects excellent varieties: according to the cultivation in this area for many years, the seeds imported from the Netherlands are generally selected, and the varieties are Fogus, Tabor, Vintor and so on, which are easy to cultivate and manage.
● should be prepared before sowing: planning and establishing internal and external ditch system as soon as possible. A horizontal ditch with a width of 35cm and a depth of 35cm was opened at the border length of 30m, and a vertical trench with a width of 30~40cm and a depth of 40cm was established every 10 rows, the width of the ditch was 40cm and the depth of the ditch was 50cm, and the depth of the ditch outside the field was 80~100cm to ensure smooth drainage. Ploughing the land as early as possible, applying basic fertilizer, applying potassium sulfate compound fertilizer 10kg / mu, making the border in the north-south direction, 90cm wide, sowing 3 rows, ditch width 30cm, deep 30cm more than to enhance soil permeability.
● sowing in time: according to the planting experience in recent years, the best sowing time is from July 25th to August 15th. Sowing too early will bolting ahead of time, vegetative growth into reproductive growth, losing the role of fleshy root; sowing too late, the rhizome overwintering damage, affecting the quality of fleshy root.
● precision sowing: on the border, strip sowing is carried out according to the row spacing 30cm, generally using 50 ~ 60g (25000 ~ 30000 seeds) per mu.
● sowing method: large area sowing machine is selected to sow seeds, sowing depth 1cm, and check the cover thickness after sowing. In case of rainy days, manual sowing can be added.
● timely mulch: watering and then covering grass after sowing, check seedling emergence and humidity after cover, remove mulch in time to prevent tall seedlings. In this way, the effects of high temperature exposure and rainstorm erosion on Dutch chrysanthemum can be prevented, and the evenness of seedlings can be ensured.
● just-in-time interseedling: the first interseedling was carried out at 5-6 leaf stage, the plant spacing was 6~7cm, and the seedlings were gently cut off with a knife, and the second interseedling was carried out at 9-10 leaf stage, plant spacing 13~15cm, the seedlings could be gently removed from the roots. At the same time, it is combined with clearing ditches, loosening soil and weeding.
● topdressing was timely and reasonable: the leaf color faded obviously in the middle stage of chicory growth. For the fields with poor growth, it is necessary to apply a small amount of potassium sulfate compound fertilizer, 5kg per mu, or amino acid high-efficiency liquid fertilizer for extra-root topdressing, and do not overuse chemical fertilizer.
● pest control: powdery mildew and brown spot are common. 65% tophan wettable powder can be sprayed. When aphids do harm. Spray with 1000 times of dichlorvos EC.
[editor's summary]
Dutch chrysanthemum, also known as willow chrysanthemum, is a perennial herb with rich flowers and strong adaptability. it is planted all over our country, mostly for landscaping and as potted flowers. The editor of the first Agricultural Classic has introduced the planting method of Dutch chrysanthemum to you in this article. I hope it will be helpful to you.
How to plant Dutch chrysanthemum
Dutch chrysanthemum, also known as New York asters, has smooth leaves and umbels at the top of its branches, with blue-purple flowers. Dutch chrysanthemum can be potted indoors, and it can also be used as a flower basket and flower arrangement. How to raise such beautiful Compositae flowers? Let's learn how to grow Dutch chrysanthemum.
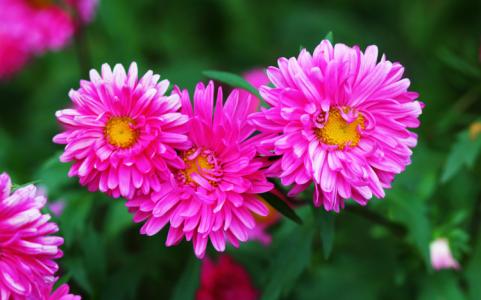
Pictures of Dutch chrysanthemum
First, how to grow Dutch chrysanthemum
Dutch chrysanthemum likes sunny and ventilated environment, strong adaptability, wet and drought tolerance, low requirements for soil, fertile and loose sandy soil is the most suitable for the growth of Dutch chrysanthemum. Dutch chrysanthemum should be fully fertilized before planting, and fertilizer should be applied every half a month during the growing period to promote the vigorous growth of Dutch chrysanthemum.
When it is found that diseases and insect pests are found in the cultivation of Dutch chrysanthemum, pesticides should be sprayed in time. Dutch chrysanthemum is generally easy to be infected with powdery mildew and brown spot, so it should not be too dense when planting, and pay attention to humidity and ventilation. Once Dutch chrysanthemum is found to be infected, it should be sprayed in time, and it can be sprayed with 65% Topurazine wettable powder 600 times. When the Dutch chrysanthemum is damaged by aphids. Spray with 1000 times of dichlorvos EC.
Pictures of Dutch chrysanthemum
2. Planting methods of Dutch chrysanthemum
1. Plots: Dutch chrysanthemum is a dry crop, so you need to choose plots with convenient transportation and close to water sources. Requires loose texture, fine broken soil, good air permeability, pH6.5~7 sandy soil or sandy loam.
two。 Variety: according to many years of planting in this area, generally choose Dutch imported seeds, varieties are Fogus, Tabor, Vintor and so on, which are easy to cultivate and manage.
3. Sowing preparation: early planning and establishment of internal and external ditch system. A horizontal ditch with a width of 35cm and a depth of 35cm was opened at the border length of 30m, and a vertical trench with a width of 30~40cm and a depth of 40cm was established every 10 rows, the width of the ditch was 40cm and the depth of the ditch was 50cm, and the depth of the ditch outside the field was 80~100cm to ensure smooth drainage. Ploughing the land as early as possible, applying basic fertilizer, applying potassium sulfate compound fertilizer 10kg / mu, making the border in the north-south direction, 90cm wide, sowing 3 rows, ditch width 30cm, deep 30cm more than to enhance soil permeability.
4. Timely sowing: bolting, vegetative growth into reproductive growth, losing the role of fleshy root; sowing too late, the rhizome overwintering damage, affecting the quality of fleshy root. On the border, strip sowing is carried out according to the row spacing 30cm, generally using 50 ~ 60g seeds per mu (25000 ~ 30000 seeds).
5. Sowing method: sowing in a large area with sowing machine, sowing depth 1cm, and checking the cover thickness after sowing. In case of rainy days, manual sowing can be added. After sowing, first water, and then cover the grass, after the cover, pay attention to check seedling emergence and humidity, timely remove the mulch to prevent tall seedlings. In this way, the effects of high temperature exposure and rainstorm erosion on Dutch chrysanthemum can be prevented, and the evenness of seedlings can be ensured.
6. Timely interseedling: the first interseedling was carried out at 5-6 leaf stage with 6~7cm, and the seedlings were gently cut off with a knife, and the second interseedling was carried out at 9-10 leaf stage with plant spacing 13~15cm, which could be gently removed from the root. At the same time, it is combined with clearing ditches, loosening soil and weeding.
7. Reasonable topdressing: in the middle stage of chicory growth, the leaf color faded obviously. For the fields with poor growth, it is necessary to apply a small amount of potassium sulfate compound fertilizer, 5kg per mu, or amino acid high-efficiency liquid fertilizer for extra-root topdressing, and do not overuse chemical fertilizer.
8. Note: choose sunny, ventilated environment and fertile, well-drained sandy loam. During the growing period, fertilization is applied once a month, and plastic surgery and coring is carried out in summer to promote more branches and flowers, but the plant should not be too dense, otherwise powdery mildew is easy to occur.
Pictures of Dutch chrysanthemum
Dutch chrysanthemum planting method has been introduced, I do not know how you learn, large area planting may be more difficult to manage, potted planting is still relatively simple, I hope the above content is helpful to everyone.

- Prev
Maintenance measures of Dutch Chrysanthemum
1. Light management Dutch chrysanthemum likes an environment with plenty of light and good ventilation, so make sure there is plenty of sunshine. 2. Watering management the Dutch chrysanthemum should be watered appropriately, according to the dry soil, and remember that there should be no stagnant water. 3. Soil management: choose soil with loose soil and good drainage and permeability.
- Next
Plants suitable for breeding indoors
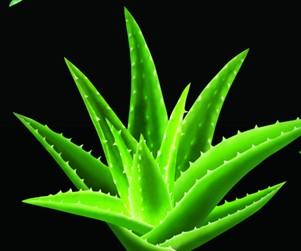
1. Aloe can not only beauty and beauty, but also absorb harmful gases and purify the air. 2. Black Beauty can absorb exhaust gas and convert it into oxygen, so it is very suitable for indoor breeding. 3. The Silver Queen can absorb dust and some harmful gases in the air and purify the air.
Related
- Fuxing push coffee new agricultural production and marketing class: lack of small-scale processing plants
- Jujube rice field leisure farm deep ploughing Yilan for five years to create a space for organic food and play
- Nongyu Farm-A trial of organic papaya for brave women with advanced technology
- Four points for attention in the prevention and control of diseases and insect pests of edible fungi
- How to add nutrient solution to Edible Fungi
- Is there any good way to control edible fungus mites?
- Open Inoculation Technology of Edible Fungi
- Is there any clever way to use fertilizer for edible fungus in winter?
- What agents are used to kill the pathogens of edible fungi in the mushroom shed?
- Rapid drying of Edible Fungi