Waste recycling makes your succulent journey more exciting.

Preface
Follow encyclopedia to meet beauty (WeChat account: duoroubaike)
The text begins:
Thank the author [Xia] for her original contribution and sharing.
Submission date: July 29, 2018
Editor: encyclopedia
Coordinates: Heilongjiang Wuchang
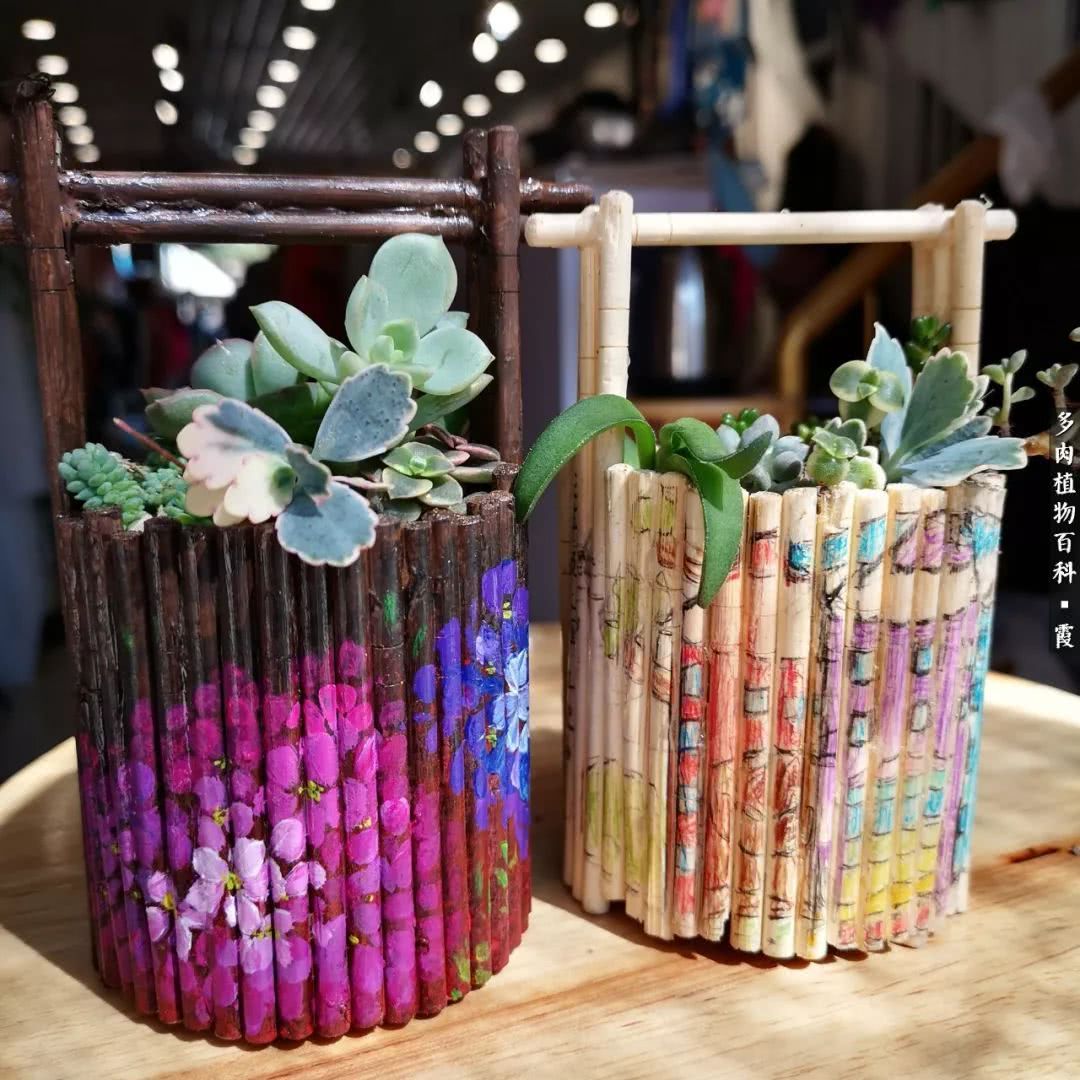
First put the finished photo in front, so that you can continue to look down, do not forget to give me a like after reading, so that the encyclopedia Jun always said that the number of hand-painted articles is not up.
Summer is coming, everyone is starting to stop, and there are fewer people posting beautiful pictures. Too many people drink beer and drinks, and I always feel that it's a pity to throw away those bottles and cans. You know, raising succulent flowerpots is also an important expense. We are all forced by succulent plants to pick up garbage everywhere and have to think about the use of enlightened waste! One day I finally saw a video of using cans to make flowerpots. Here, I dedicate the method to the meat slaves.
First of all, choose an aluminum can. Why do you want an aluminum can? Because it won't rust and spoil.
Then cut it at the height you like.
Don't forget to dig a hole in the bottom.
Then cut the disposable chopsticks into 4 long ones, 2 short ones and 38 short ones.
Grind the broken head with sandpaper
Then use glue stick, or AB glue, E6000 glue to glue the cut stick to the periphery of the can, we stick it long first.
Then glue the long one on the opposite side, so that the can is divided into almost equal halves.
Then stick the short ones to the side, no need to be tidy, anyway, I just stick at will, I like this kind of messy beauty. Finally, there is one or two in the middle, and such a self-made small bucket flowerpot is completed.
Is that how it ends? No, for someone who likes to toss around like me, I still want to leave my mark on it. So the hand-drawn program was started.
First put on a brown bottom, in fact, this is already a bit of carbonized wood.
Then stick the black paint and poke it in front of the flowerpot at will to make a gradual shadow.
Then use red to poke out smaller shadows.
Stick rose red with a round pen, one petal at a time, draw a circle at will
Then rose red plus white or a little dark blue, painted on the second floor, each petal in this layer should be painted repeatedly to deepen the color.
The third layer is more white, and each petal is also painted once or twice.
The middle is white plus rose red, repeat twice, the color is plump on the line.
In the same way, draw the blue and purple parts next to it.
A few strokes with unfaithful love and leaves
Brush with waterproof paint, dry and succulent on the basin. My daughter is interested in my flowerpot and wants to draw one herself. Hers is painted with colored lead. During this holiday, creating with children is also a very interesting parent-child activity. Take a look at the group photo of my daughter's work and see if it looks good.
Another is a chassis painted with disposable plates of birthday cakes, which are good for flowerpot bottoms or decorations. Also put on the finished product picture first, forgive me for not having time to stick the diamond in the thumb basin, and I would like to thank @ Jintuan for sponsoring the peach eggs.
Prototype
Brush the background color
Draw manuscripts and use HB pencils. I regret using 2B pencils now.
In this work, I just want to focus on halo dyeing, because our substrates do not absorb water, halo dyeing is not as easy as meticulous painting. But we can do it layer by layer.
First of all, prepare two pens. After one pen is colored, the other clean pen will dim the color out. A shallow layer
When dry, repeat the halo again.
Draw the leaves, birds, hook the edge to finish.
Because the space is limited, I am afraid that it is easy to get tired if it is too long, so I will omit some later. If you do not understand, you can find me in the encyclopedia hand-painted 1: 5, 9 groups, we communicate, or leave a message, let me know your ideas, next time to improve, thank you!
This article has been exclusively authorized by the author Wechat official account: succulent Plant Encyclopedia (ID:duoroubaike), the content of the article does not represent the official account's point of view and position! Encyclopedia has signed a contract with a third-party Internet copyright protection company to open a network-wide protection of rights, unauthorized reprinting of other platforms is strictly prohibited! If the theft is found, the tort will be held responsible! Netizens are welcome to report!
Appreciate this article
At present, the official account appreciation function has been adjusted, with the author Wechat appreciation code instead of system appreciation, if you want to appreciate the author, please directly identify the Wechat appreciation code, praise to the author of this article!
Advertising ADVERTISEMENT
Succulent culture needs you and me to promote it! Remember to share more articles to make more people fall in love with succulent plants! Use the power of plants to influence and heal the people around us!
- Prev

Mastered these breeding techniques of tiger thorn plum blossom all the year round
Tiger thorn plum, also known as iron begonia. When blooming, the red flowers hang all over the branches, "a little red in the green bushes", which is very lovable. Tiger thorn plum is a very solid flower, some flower friends raise tiger thorn plum, luxuriant branches and leaves do not blossom! ...
- Next

Feelings on the maintenance of succulent plants
A misunderstanding of the maintenance of succulent plants often hear some people say that succulent plants can not be watered more, watering can only be a little less. People who hold this view immediately move pots when it rains, thinking that they must not be caught in the rain. ...
Related
- Wuhan Hospital Iron Tree Blooming Result Was Instantly Frightened by the Gardener Master
- Which variety of camellia is the most fragrant and best? Which one do you like best?
- What is the small blue coat, the breeding methods and matters needing attention of the succulent plant
- Dormancy time and maintenance management of succulent plants during dormancy
- Minas succulent how to raise, Minas succulent plant pictures
- What are the varieties of winter succulent plants
- How to raise succulent plants in twelve rolls? let's take a look at some experience of breeding twelve rolls.
- Attention should be paid to water control for succulent plants during dormant period (winter and summer)
- Watering experience of twelve rolls of succulent plants
- Techniques for fertilizing succulent plants. An article will let you know how to fertilize succulent plants.

