How to plant Auricularia auricula with leaf bags?

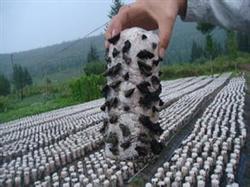
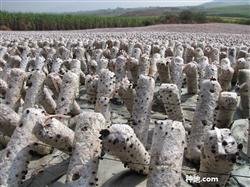
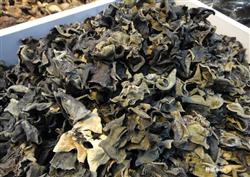
How to plant Auricularia auricula with leaf bags? Please advise that with the rapid development of bag-planted Auricularia auricula, the traditional use of sawdust as culture material has been far from meeting the needs of various places. The research group of Linkou County Science and Technology Association Edible and Medicinal Fungi Promotion Center in Heilongjiang Province has succeeded in using leaves instead of sawdust to cultivate Auricularia auricula. The invention of this new technology will produce inestimable economic and social benefits. The main technical points are introduced as follows. First, the raw material treatment of broad-leaved leaves. Collect the fallen leaves and twigs from the forest area and dry them and crush them. Crush 30 kg of dry leaves and 10 kg of bean straw. Second, the formula and preparation method of culture material. ① cultivation material formula: leaf powder 71.7%, bean straw powder 20%, corn meal 5%, soybean powder 2%, gypsum 0.6%, lime powder 0.7%, water content 55%, pH 7-8.5. ② preparation method: weigh the required amount of dry leaf powder and spread it on the cement floor, sprinkle the bean straw powder into the leaf powder (dry material) and mix well. Sprinkle cornmeal and soy flour on top of leaf powder and mix well. Then dissolve the gypsum and white ash in warm water and sprinkle them on the wet and dry material, and sprinkle water while mixing. After mixing the wet material well, sieve the material with thick iron wire twice to make the material thickness uniform and the water content up to 55%, that is, rub the material with both hands, the hands have a sense of moisture and can not store water. Third, bagging, sterilization and inoculation. ① bagging: culture material bagging, bacteria bag selection of 17cm × 33cm × 4.5cm thick qualified polyethylene bag. While loading and compacting, make the culture material in the bag a little tighter, but do not expand and break the bag. Leave 9 cm at the mouth of the bag. after pressing and compacting the material surface, use a round iron bar with a diameter of 2.5 cm to pierce a deep hole in the middle of the bag, with a depth of 2 cm from the bottom of the bag. Pour out the loose material when it is piercing to prevent it from blocking the mouth of the eye. Then close the mouth of the bag and press it down slightly (excluding the air inside the bag). Hold the mouth of the closed bag and twist it clockwise, then press the mouth of the bag with your finger and place it upside down in an iron basket or on the curtain of a wooden steamer (2-3 layers of bags can be inverted on each layer of iron basket or wooden curtain). ② atmospheric pressure sterilization: put the material bag into the pot and close the door of the pot, heat it with high heat, and quickly make the temperature of the steamer reach 100℃. Heat preservation, sterilization for 6-8 hours and then cease fire. Continue to simmer in the steamer overnight. Out of the pot the next morning. When the atmospheric cooker is short of water, it is necessary to add more than 90 ℃ of boiled water, and each time boiled water needs to be sterilized for half an hour. When going out, loading and handling, both hands are required to hold the middle of the bag. ③ inoculation: use thick iron sheet to make a barrel slightly larger than the electric furnace, 35 cm high, put on the electric furnace, put a layer of ultra-fine barbed wire on the barrel and fixed (barbed wire is used to prevent bacteria from falling into the furnace to produce smoke). When the temperature of the waiting bag drops to 28 ℃, inoculate in the aseptic area above the barrel of the electric furnace. During the inoculation period, it is required to operate briskly to prevent the wind from impacting the heat on the barrel. Each bottle of original seed can be transferred to 25-30 bags of cultivated species. Fourth, the treatment of bacteria room and mycelium culture. Treatment of ① germ room: clean up the indoor sundries, the walls of the culture room should be smooth and smooth, paint the room once, and build the germ rack with dry wood poles. The room temperature was raised to 30 ℃ and kept for 24 hours to revive the indoor miscellaneous spores, wet the indoor walls and shelves with 0.2% carbendazim solution, and keep the indoor air humidity at 75%. Fumigate with 15 grams of sulfur per cubic meter of space, kill the resurrected bacteria, and finally heat and dry the walls and shelves of the room. ② mycelium culture: immediately after receiving the bacteria, the material bag is moved to the shelf in the culture room, the mouth of the material bag is facing up, the room is kept dark, and do not put too crowded between the bag and the bag. The period of mycelium germination and colonization is 5-10 days before the emergence of bacteria, and the suitable room temperature is 28 ℃. During this period, no ventilation was needed, the temperature should not exceed 30 ℃, the mycelium grew to 1 / 3, and the indoor temperature dropped to 24 ℃. Check once a day, found that miscellaneous bacteria immediately take the bag out of the culture room. Often sprinkle white ash on the ground to dry the room. In the middle and later stage, the room temperature should be controlled at 18-22 ℃. And often ventilate and breathe. The hyphae can grow all over the bag in 35-40 days. After that, the hyphae were stimulated by temperature difference and cultured in visible light for 10 days, so that the hyphae could be fully fed through. Fifth, ear management of three-dimensional lifting bags in the greenhouse. The cultivation of Auricularia auricula with three-dimensional hanging bag in simple greenhouse has the advantages of heat preservation, good moisture retention, convenient management, small area and large number of cultivation. First of all, a simple ear shed is built with thick wooden poles (2 meters high, 6 meters wide, 15 meters long, and 10,000 three-dimensional hanging bags). Leave 1 meter wide cultivation management road in the middle of the ear shed, pull a No. 10 iron wire every 25 centimeters on the shed, and fix both ends for hanging bags and binding ropes. The four sides of the scaffolding and the roof are surrounded by grass curtains or crop straw. The ground was first sprayed with 0.2% carbendazim solution, dried slightly and then disinfected with a layer of white ash. After the bacteria bag is fully fermented, move it into the cultivation shed, scrub the surface of the bag with 0.2% potassium permanganate solution, tie the bag to the wire rope, and cut it with a disinfection blade after hanging one rope. There are 5 long vertical bar spacer openings in each bag and 2 small short openings at the bottom of the bag. After all the bacterial bags were hoisted and cut, the ear-raising period kept the temperature in the shed at 20 ℃, sprayed water to the ground 2-3 times a day, often sprayed water on the grass curtains around the greenhouse, kept the relative humidity of the air in the shed 85%, and cultivated in calm wind. The primordium was formed from the incision in 7-10 days. When the ear buds seal the cut, you can spray water directly onto the bag (the air relative humidity of this period should be 90-95%). The temperature should not exceed 26 ℃. Due to the large number of three-dimensional hanging bags in the greenhouse, it is required to spray more and frequently in the upper layer and less and slightly in the lower layer when spraying water. The amount of spraying water should be controlled flexibly, but you can't spray water when the temperature is high at noon. So that the ear piece is flat and does not roll the edge, and the glossy and moist feeling reaches the best standard. In short, the ear edge does not need to spray water, black fungus growth to the middle and later stage, should maintain fresh air circulation in the shed, less spray in cloudy days, less spray in rainy days or no spray in rainy days. When the temperature and humidity are high, more attention should be paid to strengthening ventilation, which is not only beneficial to the growth of Auricularia auricula, but also an effective measure to prevent miscellaneous bacteria pollution and ear rot. It takes 30 days from cutting ear to mature harvest. On average, this culture material can produce 60-70 grams of dry ears per bag. When Auricularia auricula is mature, choose to pick it when there is plenty of sunshine. The harvested fungus is spread out on the ventilated screen curtain in time, and the ear is turned once when it is semi-dry, which can be dried and stored in 2 days. Click to get more cultivation techniques of Auricularia auricula
- Prev

How to cultivate Auricularia auricula with straw?
How to cultivate Auricularia auricula with straw? Please introduce the cultivation of Auricularia auricula with straw after the autumn harvest, there is a large amount of straw surplus in the countryside, which is a great pity to be thrown away. The effect of cultivating Auricularia auricula with straw is very good, and it is also a way for farmers to get rich. Practice shows that generally, more than 10 kilograms of dried black fungus can be harvested per 100 kilograms of rice straw.
- Next

How to plant black fungus?
How to store fungus? Please guide the optimal storage temperature of Auricularia auricula: 0 ℃ relative humidity: fungus above 95%RH can be sold fresh or dry. Those who are dry can store it better, but the flavor of fresh ears is more delicious, and the two can be chosen according to people's preferences. Fresh ears are difficult to store and can be stored at low temperature immediately after harvest.
Related
- Fuxing push coffee new agricultural production and marketing class: lack of small-scale processing plants
- Jujube rice field leisure farm deep ploughing Yilan for five years to create a space for organic food and play
- Nongyu Farm-A trial of organic papaya for brave women with advanced technology
- Four points for attention in the prevention and control of diseases and insect pests of edible fungi
- How to add nutrient solution to Edible Fungi
- Is there any good way to control edible fungus mites?
- Open Inoculation Technology of Edible Fungi
- Is there any clever way to use fertilizer for edible fungus in winter?
- What agents are used to kill the pathogens of edible fungi in the mushroom shed?
- Rapid drying of Edible Fungi

