How to plant Auricularia auricula in summer?
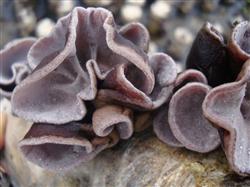
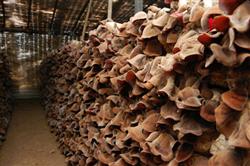
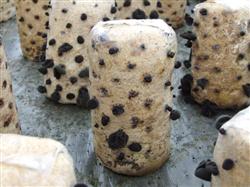
How to plant Auricularia auricula in summer? Please guide the substitute cultivation of Auricularia auricula and Auricularia auricula can be planted in spring and autumn, most of which are cultivated in spring. However, spring planting is generally at low temperature in the early stage, and it is difficult to develop bacteria. In the later stage, the temperature of the ear is high and there are many malformed ears. In order to solve this problem, oversummer cultivation with soil mulching was carried out. 2000 kg of material was added and 4000 cylinders of bacterial bags were made, with a success rate of 90%. By the end of September, a total of 2934 kg of fresh ears were collected, with a biological efficiency of 159.46%, and good economic benefits were achieved. The cultivation techniques are as follows: the cultivation techniques of Auricularia auricula covered with soil made by ㈠ are as follows: the inoculation time of making fungus tube should be 30-45 days later than that of conventional spring planting, that is, from late April to early May, when the temperature is 20 ℃ days, it is suitable for mycelium growth of Auricularia auricula. Preparation of culture materials: cottonseed shell 80%, wheat bran 16%, sugar, gypsum, quicklime, superphosphate 1% each. The ratio of material to water is about 1: 1.2, first dissolve sugar and calcium superphosphate in water, then mix material while splashing water, until even. Put the material bag into a 17 × 33 cm polyethylene bag, pack about 500 grams of dry material, and sterilize under atmospheric pressure after sealing. After inoculation, it was moved into the bacteria room and stacked in a zigzag shape, with a height of 6 meters and 8 storeys. The bacteria room should be well ventilated, shaded, the temperature should be controlled below 30 ℃, and the doors and windows should be opened for ventilation once every morning and evening for 30 minutes each time. When the temperature rises gradually in the later stage of bacteria infection, the times and time of ventilation should be increased accordingly. Turn the pile once a week to check the bacteria and remove the contaminated bacteria. If it is found that the mycelium growth is poor or does not eat, piercing holes can be used to increase oxygen to promote mycelium growth. Generally cultured for 40 days, the hyphae can be full of material bags. The ㈡ bag covered with soil can be cultivated after the bag is full of mycelium. Before you take off your bag, you must prepare the land and make the bed. Choose shady land near water source and well ventilated (forest or shiitake shed) to make a border with a width of 1 meter, a depth of 20 centimeters and an unlimited length. The bed is in the shape of a tortoise and sprinkled a thin layer of lime on the border surface. Then scrub the bacterial tube with 0.1% potassium permanganate solution, then cut open the film and remove the bag with a sharp blade, and arrange it neatly on the bed, covering a layer of 2 cm thick vegetable garden soil or fine soil in the field, which is required to be fertile and loose. Finally, the bow-shaped shed is covered with film to moisturize. ㈢ ear management the key to the management of soil cover is water regulation. Generally, the water spraying management is carried out on the second day after covering the soil, and it is sprayed once in the morning and evening. At this time, due to entering the summer, the temperature is high and the evaporation is large, so the water should be sprayed carefully and lightly, so that the water permeates the soil and keeps the covering soil moist all the time. Generally, the hyphae began to stretch to the soil surface after 3 days of soil mulching, and the ear buds appeared in about 12 days, and began to enter the ear-exiting stage. At this time, water spraying on sunny days should be increased to 4 times a day. When spraying water, it should be combined with ventilation to make dry, wet, wet and dry alternately, so as to keep the earpiece not dry and edge-free. Cover with film to protect against rain on rainy days, but leave tuyere at both ends. During this period, the air of the ear field should be kept fresh, and the air humidity should be controlled at 90% to 95%. If the ear bud is about 15 days after the ear bud, the ear piece is fully unfolded, there are wavy lines on the edge, and can be harvested when the ear root is loose. After the first tide ear is harvested, the residual ear root on the covered soil surface should be removed in time, stop spraying water for 2mi for 3 days, cover the film and keep warm, so that the mycelium can resume growth. About 4-5 days, when the second tide ear bud begins to form, uncover the film ventilation, spray water to moisturize, the method is the same as before. In general, it can harvest 5ml and 6 tides, and the biological effect is stable at about 150%. The cultivation of Auricularia auricula covered with soil over summer has the advantages of stable material temperature, less pollution, quick ear emergence, large and neat ear piece, distinct tide, no site restriction and so on. At the same time, it can overcome the shortcomings of slow mycelium growth in spring cultivation and difficulty in low temperature ear emergence in the later stage of autumn planting, and due to the enhancement of moisture retention after soil mulching, it avoids the phenomenon of water loss in conventional bag cultivation, so it has an obvious effect on increasing production. Click to get more Auricularia auricula planting techniques

- Prev
How to manage Auricularia auricula in summer?
How to manage Auricularia auricula in summer? Please introduce Auricularia auricula can refer to the following methods for management: 1. To make fungus tube for oversummer cultivation, the inoculation time of fungus tube should be 30-45 days later than that of conventional spring planting, that is, from late April to early May, when the temperature is 20 ℃ and 30 days, it is suitable for hair.
- Next
What should Auricularia auricula pay attention to when it comes out of the ear?
What should Auricularia auricula pay attention to when it comes out of the ear? Please guide Auricularia auricula to produce high-quality and high-yield Auricularia auricula from May to October each year. Scientific management methods are very important. The key techniques for the management of Auricularia auricula are as follows: first, the temperature range to control the growth of ear slices is as follows.
Related
- Fuxing push coffee new agricultural production and marketing class: lack of small-scale processing plants
- Jujube rice field leisure farm deep ploughing Yilan for five years to create a space for organic food and play
- Nongyu Farm-A trial of organic papaya for brave women with advanced technology
- Four points for attention in the prevention and control of diseases and insect pests of edible fungi
- How to add nutrient solution to Edible Fungi
- Is there any good way to control edible fungus mites?
- Open Inoculation Technology of Edible Fungi
- Is there any clever way to use fertilizer for edible fungus in winter?
- What agents are used to kill the pathogens of edible fungi in the mushroom shed?
- Rapid drying of Edible Fungi