How to sliced and sprouted potatoes?
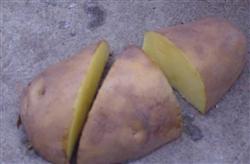
How to sliced and sprouted potatoes? What is there to pay attention to? There are no netizens to help introduce the method of slicing and sprouting of potato seeds arranged by the farming network, the following is a detailed introduction for netizens' reference. The slicing method of potato seed potato: 1. The size of seed potato: generally, the weight of seed potato should not be less than 20-25g, that is, 20-25 pieces per 500g seed. There should be at least 1 or 2 bud eyes on each cut. 2. The operation of the seed potato cutting method: the seed potato with a size of about 50g can be cut into 2 pieces longitudinally from the top to the tail, and the seed potato with a size of 70-90g can be cut into 3 pieces, the method is that one piece with 2 bud holes is cut off from the base, and the rest is cut into 2 pieces longitudinally; the seed potato with a size of about 100g can be longitudinally cut into 4 pieces, which is beneficial to increase the number of blocks with top buds. For large potato chunks, you can start from the tail of the seed potato, spiral to the top according to the order of the bud eyes, and finally divide the top into two. Matters needing attention when slicing seed potatoes: 1. When slicing, attention should be paid to not being too small. Because the smaller the block, the less nutrients and water it carries, which will affect the development of seedlings. Moreover, if the cut is too small, its drought resistance is poor, and it is easy to be short of seedlings after sowing. 2. When cutting diseased potatoes, they should be destroyed and the cutters should be disinfected at the same time, otherwise germs will spread. The disinfection method is to use the fire barbecue cutter, or scrub the cutter repeatedly with 75% alcohol, or soak the cutter with 1% potassium permanganate for 20-30min before use. Management and sprouting method of potato seed potato after slicing: potato seed management after slicing: after the potato is cut, the potato is evenly spread out to dry the wound under the condition of temperature 17-18 ℃ and relative humidity 80-85%. It takes 3-4 days to produce cork layer, which can avoid rotten potato in the process of accelerating germination. When drying and slicing, it should not be carried out in an overly dry environment, so as to avoid losing too much water. After the damaged piece is "dried", it can be accelerated to sprout. The common methods of budding are as follows. Seed potato sprouting method 1: in the greenhouse near the root of the wall or on the end of the walkway in the plastic greenhouse (away from one end of the shed door), build a pool with 2-3 layers of brick wall, depending on the number of seed potatoes. If the ground is too dry, you should first spray a small amount of water to make it slightly moist, and then spread a layer of potato pieces, sprinkle a layer of wet sand or wet saw (pay attention to disinfection, you can use daylight disinfection, burning disinfection, drug disinfection, etc.). In this way, 3-5 layers of potato pieces can be spread, and finally covered with grass or gunny bags to moisturize, but not covered with plastic film. Seed potato sprouting method 2: you can use the existing seedbed, you can also dig a seedbed. The method of sprouting is to flatten the bottom of the bed first, then sprinkle a layer of wet sand on each layer of good sand, spread a total of 5 layers of potato, and finally cover the sand with a layer of grass. Carry the bamboo pole on the seedbed, cover it with thin film, press it with soil around, and cover it with grass to keep warm at night. The third method of seed potato germination: when the number of seed potato is small, it can be germinated directly indoors. You can put the potato pieces in the basket, or spread them on the ground by 10-15cm thick, and then cover the baskets or potato piles with wet gunny bags or wet grass. Key points of potato management during sprouting period: first, humidity management: humidity should not be too high in the process. The sand or saw covering the seed potato should first be wet with water, and then sprinkle on the seed potato. Do not cover the dry sand first and then splash water, so that a large amount of water will seep into the seed potatoes, resulting in excessive humidity. The humidity of the sand is that you can't hold water with your hands. During the budding period, do not water as long as the sand is not very dry. If the humidity is high during the budding period, it is easy to cause the stems of young buds to take root, and these roots will dry up or die due to loss of water before sowing, thus affecting the occurrence of new roots after sowing. Temperature management: the optimum temperature for potato sprouting is 15 ℃. The temperature below 4 ℃ basically did not germinate, but when the temperature was higher than 25 ℃, the germination was faster, but the bud was weaker. Third, check the seed potato regularly: during the period of accelerating germination, the germination should be checked every 5-7 days. If you find rotten potatoes, you should pick them out in time, and at the same time pick out other potato pieces to dry them, and then sprout them. Fourth, greening seed potato buds in time: the suitable sowing bud length of potato is 1.5-2cm. When the length of the bud reaches 1.5-2cm, the potato with the bud is placed under indoor scattered light to make the bud turn green. After the buds turn green, their own moisture decreases and becomes strong, which is not easy to be broken when sowing, and the seedlings emerge quickly and the seedlings are strong after sowing. Click to get more potato planting techniques click to get more vegetable planting techniques

- Prev
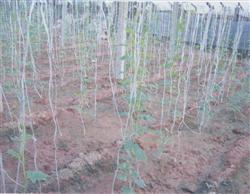
What is the advantage of balsam pear hanging vines early?
What is the advantage of balsam pear hanging vines early? What's the reason? Is there any netizen to help introduce the benefits and reasons of the balsam pear hanging vine early by the farming network? the following is a detailed introduction for netizens' reference. Balsam pear early hanging vine benefits one, can cultivate strong trees: in the seedling stage, balsam pear vine and cucumber vine together.
- Next
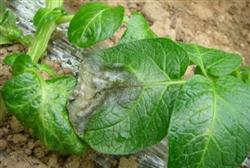
How to control potato late blight in winter?
What are the hazards of potato late blight? How to control potato late blight in winter? Are there any netizens who know about it to help introduce the farming network to sort out the harm and control methods of potato late blight? The following is listed for netizens' reference. The harm of potato late blight: water-immersed disease spots appear in potato leaves.
Related
- Where is it suitable to grow horseradish in China? it is expected to see the middle altitude horseradish in Alishan.
- How to prevent tomato virus disease reasonably? (Control methods included)
- Many people like to plant towel gourd on the balcony. What are the main points of this method and management?
- What crops can chili peppers be mixed with?
- Fertilization techniques and matters needing attention in Tomato
- What are the grafting techniques for peach seedlings in spring?
- Harm and control methods of root swelling disease of Chinese cabbage
- What are the pests of sweet potatoes? How to prevent and cure it?
- Symptoms, causes and Control methods of navel Rot in Tomato
- The cause of "Cucumber rotten bibcock" in Farmers' planting Cucumber and its Control Plan